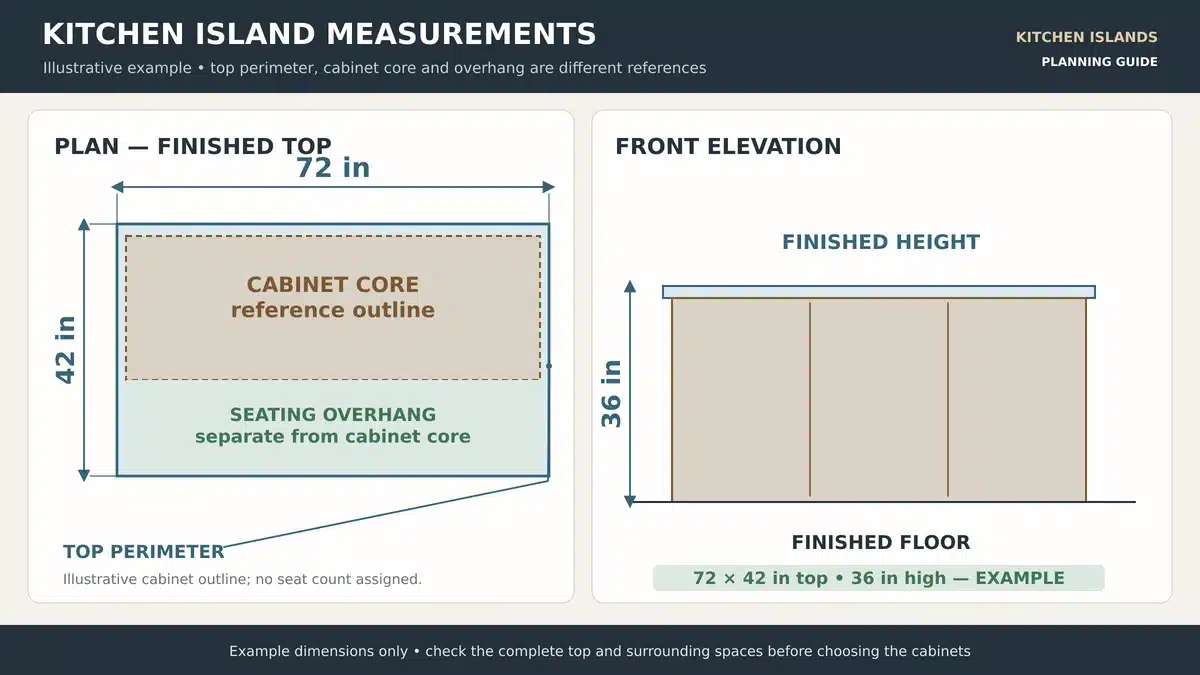
Kitchen island measurements start with the finished countertop footprint and the space around it. A typical counter-height island is about 36 inches high. For early planning, allow a 42-inch work aisle for one cook or 48 inches for multiple cooks, then check seating, appliance openings and the actual cabinet assembly. Island length and depth depend on what the room can accommodate.
This guide explains the dimensions to record, gives illustrative island sizes and shows how to calculate an available footprint. It covers residential kitchen planning; commercial foodservice layouts and accessible kitchens need a project-specific design review.
Written by Winston, Project Director at Skyland Building · 10+ Years of Building Materials Experience
Updated October 2026 · 13-minute read
Kitchen island measurements at a glance
Use these references to sketch the layout. Measure height from the finished floor and length and depth across the complete countertop. Millimetre equivalents are rounded.
| Dimension | Planning reference | What the measurement describes |
|---|---|---|
| Counter-height worktop | 36 in / 914 mm | Finished floor to top surface |
| Raised bar surface | 42 in / 1067 mm | A separate raised seating level |
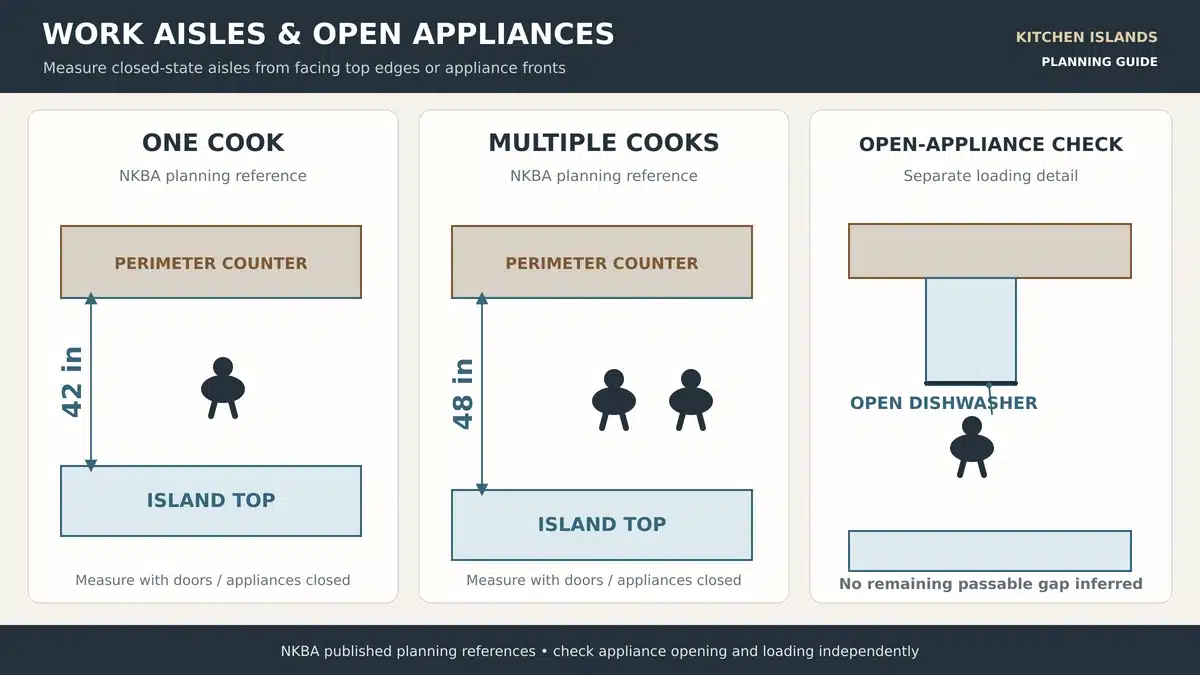
| Work aisle for one cook | 42 in / 1067 mm | Between facing counters or equipment |
| Work aisle for multiple cooks | 48 in / 1219 mm | More room for shared work |
| Walkway without work activity | 36 in / 914 mm | A passage rather than an active work aisle |
| Initial seating width | 24 in / 610 mm per diner | Usable frontage clear of supports |
The aisle and seating benchmarks in this article refer to the NKBA’s public Kitchen Planning Guidelines. They are planning recommendations. The adopted local requirements, users and selected equipment control the project layout. A generic island size does not establish accessibility compliance.
Choose an island size that fits its purpose
There is no single standard kitchen island length or depth. Start with the functions you need, then test the whole footprint against the kitchen. Adding seating, a sink or another cabinet row can change both dimensions.
Illustrative countertop sizes
The following sizes are examples to test on a plan, rather than market averages, minimum requirements or guaranteed seating capacities. Each refers to the finished top, not the cabinet box.
| Example top size | Possible use | Checks before choosing it |
|---|---|---|
| 48 × 30 in / 1219 × 762 mm | Compact prep and storage | Confirm a useful work surface and open routes; seating is not assumed. |
| 72 × 36 in / 1829 × 914 mm | Longer prep surface | A full-depth cabinet row plus a dining overhang may need greater depth. |
| 84 × 42 in / 2134 × 1067 mm | Storage with a seating side | Check clear knee depth, supports and usable seating frontage. |
| 96 × 48 in / 2438 × 1219 mm | Larger shared kitchen | Test reach across the top, end aisles, slab joints and delivery access. |
Keep the cabinet box and finished top separate
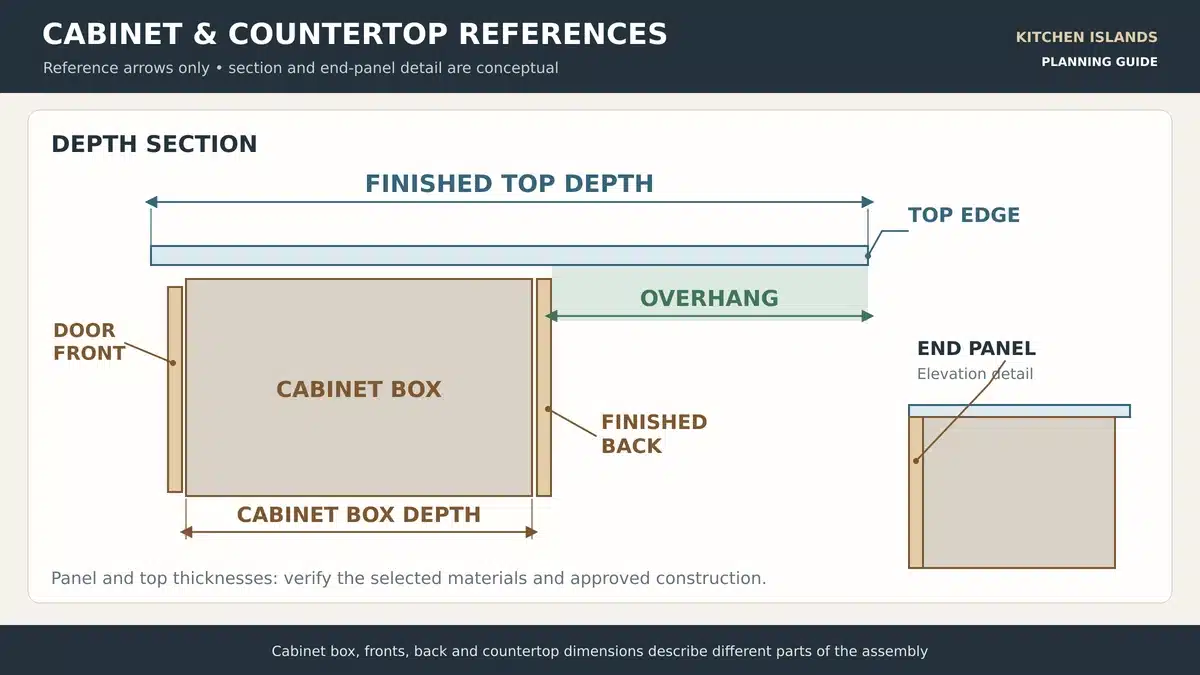
A single cabinet row creates only the core of the island. Add door or drawer fronts, the finished back, end panels, fillers and the top projections to establish its overall envelope. Back-to-back storage increases depth further. A seating side needs clear space under the top, which cannot be occupied by another cabinet row.
Use the kitchen cabinet dimensions guide for base, wall and tall cabinet references. The island plan should separately identify cabinet dimensions, finished top dimensions and every surrounding clearance.
Measure the kitchen before fixing the footprint
Record finished room dimensions and fixed features
Measure the usable room in both directions. Record columns, recesses, doorways and changes in wall alignment. Check measurements at floor and countertop levels, and note whether wall finishes and flooring are complete. Measure from a common datum so the cabinet drawing and site survey can be compared.
Show existing counter edges, tall units and appliance fronts on the plan. Include handles and projections that reduce the usable space. Door swings, drawers and appliance openings need their own outlines; an empty rectangle between closed cabinets can overstate the available area.
Calculate the available island depth
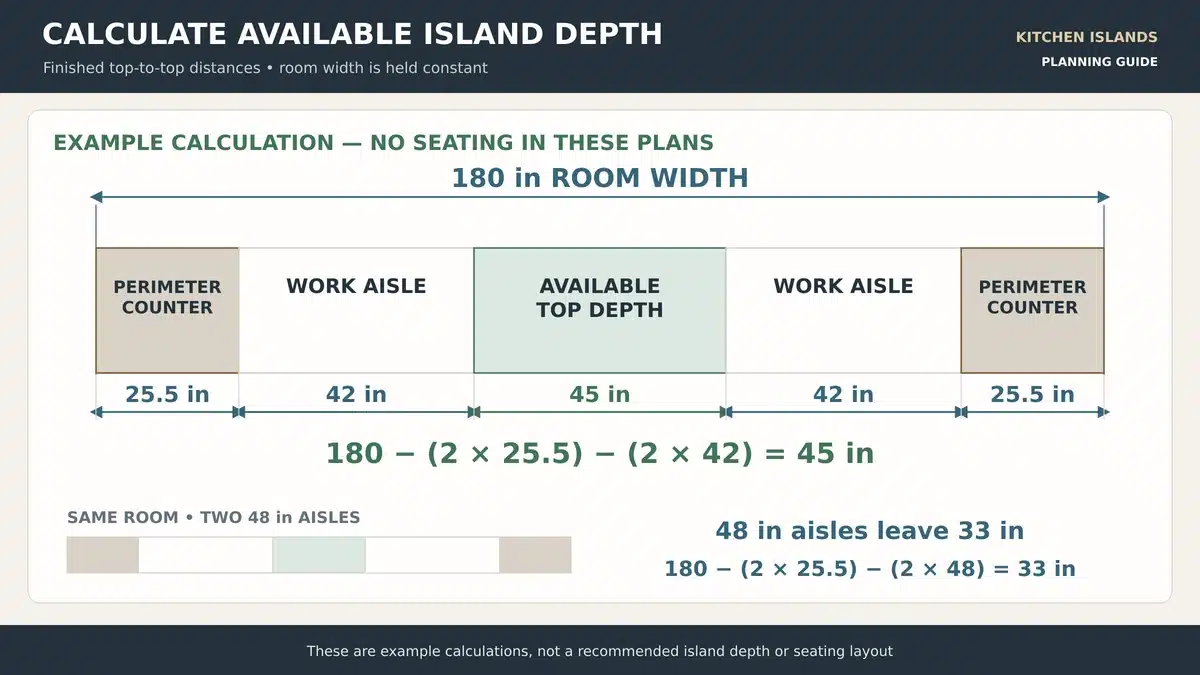
For a simple room with opposing cabinet runs, subtract the finished perimeter counter depths and the selected aisle widths from the clear room width. The remainder is the maximum top depth in that cross-section, before any tighter local obstruction is considered.
Available top depth = clear room width − left counter depth − right counter depth − left aisle − right aisle.
For example, assume a clear room width of 180 inches, two perimeter counters each 25.5 inches deep and two 42-inch work aisles. The available top depth is 180 − 25.5 − 25.5 − 42 − 42 = 45 inches, or about 1143 mm.
If both work aisles increase to 48 inches, the same room allows only 33 inches of top depth, or about 838 mm. Those dimensions are an illustrative calculation. A projecting refrigerator, seating route or doorway could reduce the usable depth further.
Repeat the check along the island length
Run the same calculation in the other direction, using the actual end obstructions and routes. A long island can fit across the room yet leave a pinch point at its end. Check the narrowest location, especially where a doorway, dining table or tall cabinet meets an island corner.
When the required footprint will not fit, reduce the functions or test a shorter island, a peninsula or a movable prep table. A mobile unit still needs a defined position that keeps routes open during use.
Set work aisles and test appliance openings
Measure the aisle from the surfaces people encounter
Apply the work-aisle reference to the facing counter frontage, tall units and appliances. Then inspect any handle or other projection at that location. A cabinet-box dimension can leave the actual gap smaller after fronts and overhangs are added.
A walkway and a work aisle serve different purposes. Keep through-traffic away from the main preparation and cleanup area where possible. A passage beside the seating side also needs to be checked with diners in place.
Show doors and drawers fully open
Use the selected appliance installation drawings to plot the refrigerator swing, dishwasher door and oven opening. Include pull-out bins and deep drawers. Check that a person can load or unload the appliance and that nearby fronts do not collide. A nominal aisle dimension alone does not prove those operations will fit.
Review the cabinet hardware specifications for pull projection, drawer travel and opening restrictions. Identify conflicts before fixing cabinet positions or drilling fronts.
Plan island seating width and knee space
Calculate usable frontage for each diner
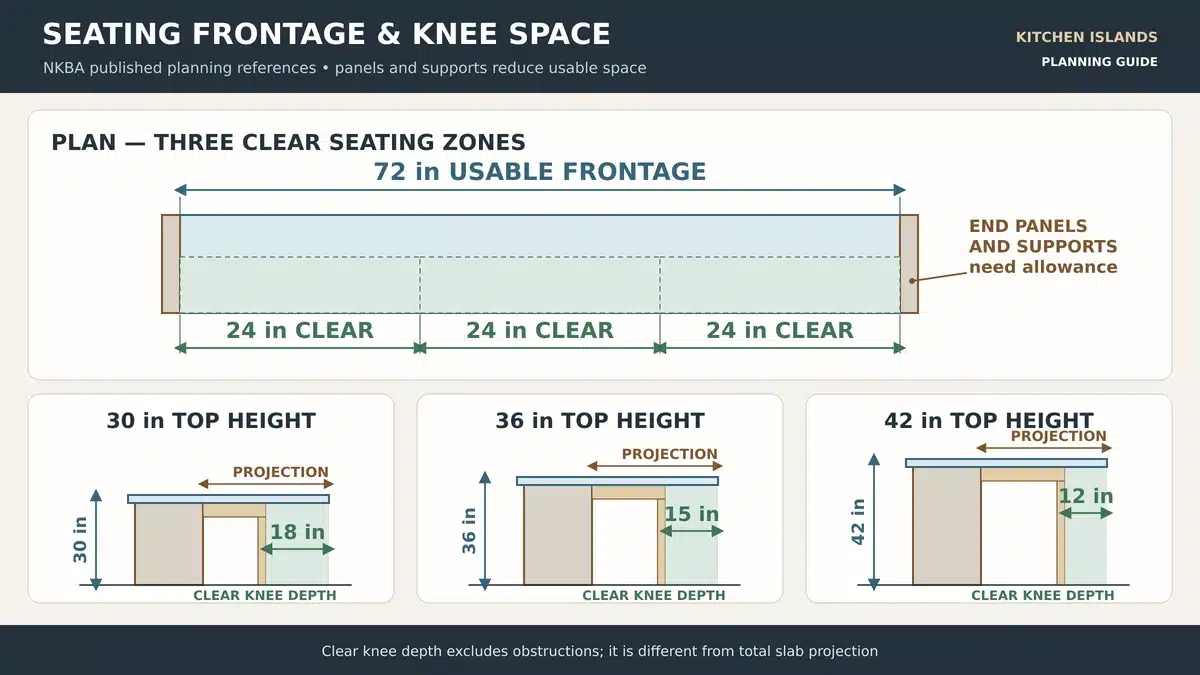
Start with about 24 inches of usable frontage per diner. Two seats therefore need about 48 inches, three about 72 inches and four about 96 inches before additional allowance for wide stools or a more generous arrangement. Measure the clear seating zone, excluding end supports and obstructions.
A 72-inch-long island does not automatically seat three people. Waterfall panels, brackets or corner seating can reduce the clear frontage. When seats turn around a corner, check overlapping knee areas and elbow room in plan rather than counting both sides independently.
Match knee space to the top height
The following NKBA references describe clear knee depth beneath the top. The slab projection alone may not provide that depth when a back panel, apron or support occupies part of the space.
| Top height | Clear width per diner | Clear knee depth |
|---|---|---|
| 30 in / 762 mm | 24 in / 610 mm | 18 in / 457 mm |
| 36 in / 914 mm | 24 in / 610 mm | 15 in / 381 mm |
| 42 in / 1067 mm | 24 in / 610 mm | 12 in / 305 mm |
Allow space behind occupied seats
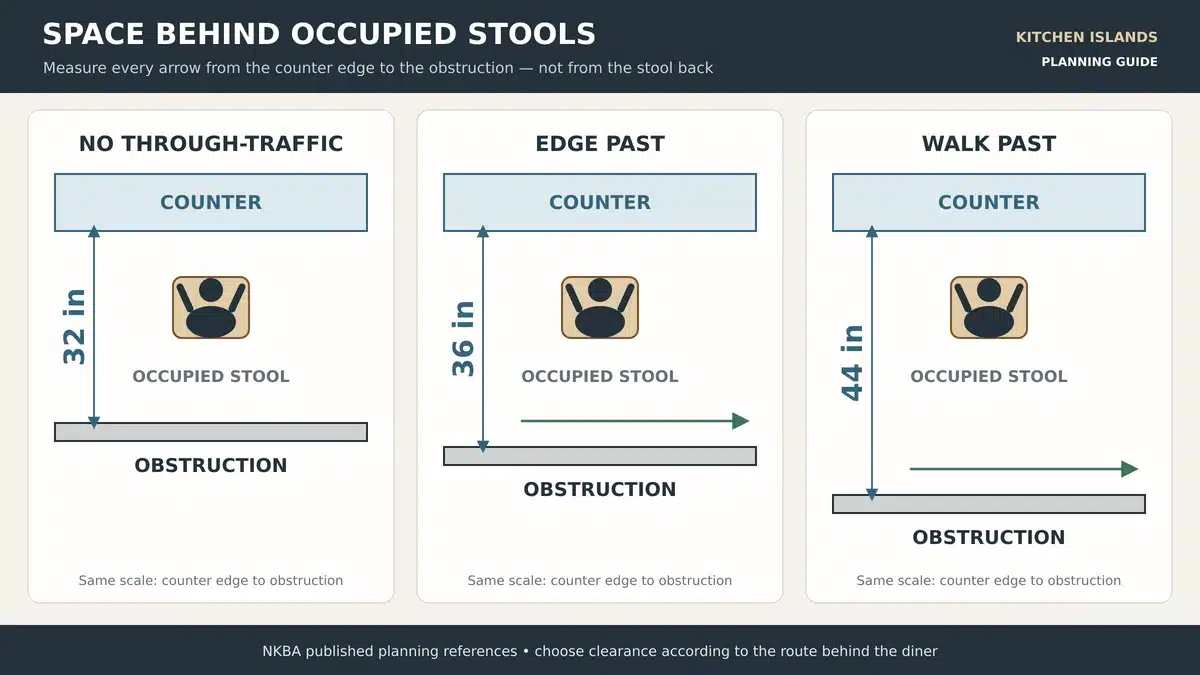
The published guide differentiates 32 inches from the counter edge to an obstruction where nobody passes behind a diner, 36 inches to edge past and 44 inches to walk past. Treat these as distinct planning conditions, then test the chosen stools and the route in use. They are not a separate clear aisle measured from the back of the stool.
A busy connection to another room may need a more generous arrangement. Position actual stools or suitable stand-ins on the floor plan, pull them out and check the passage with someone seated. Keep diners away from hot equipment and the active preparation area.
Coordinate island height depth and countertop support
Measure height from the finished floor
A worktop around 36 inches high often aligns with the surrounding kitchen counters. Check the users and intended tasks before selecting a raised bar or a lower dining surface. A split-level island also changes sightlines, usable depth and the junction between the two tops.
Finished height includes the cabinet support or plinth, cabinet assembly, any substrate and the actual top thickness. A thick-looking edge may be a built-up profile, so confirm the section detail rather than assuming that the entire slab has that thickness.
Confirm depth and overhang together
Locate the front edge, cabinet fronts, back panel and seating edge in one section. A shallow prep island and a dining island can use similar cabinets but very different tops. On a deep island, check whether the centre remains reachable for cleaning and routine use.
The sintered stone quartz and granite comparison explains the material and fabrication decisions. If considering sintered stone island countertops, review the selected slab, thickness, edge detail and cutting requirements with the fabricator.
Approve the support detail before ordering
The appropriate unsupported projection depends on the selected top, thickness, span, openings and fixing method. Obtain the supplier or fabricator’s detail for brackets, support panels or a frame, and include it in the cabinet drawing. There is no universal overhang length that is safe for every countertop.
Check that the support leaves the intended knee area usable. Include waterfall returns, seam locations and access for installation in the final dimensions. Confirm the delivery route for large tops before selecting a one-piece layout.
Size an island with a sink or appliance
Use the selected sink and appliance data
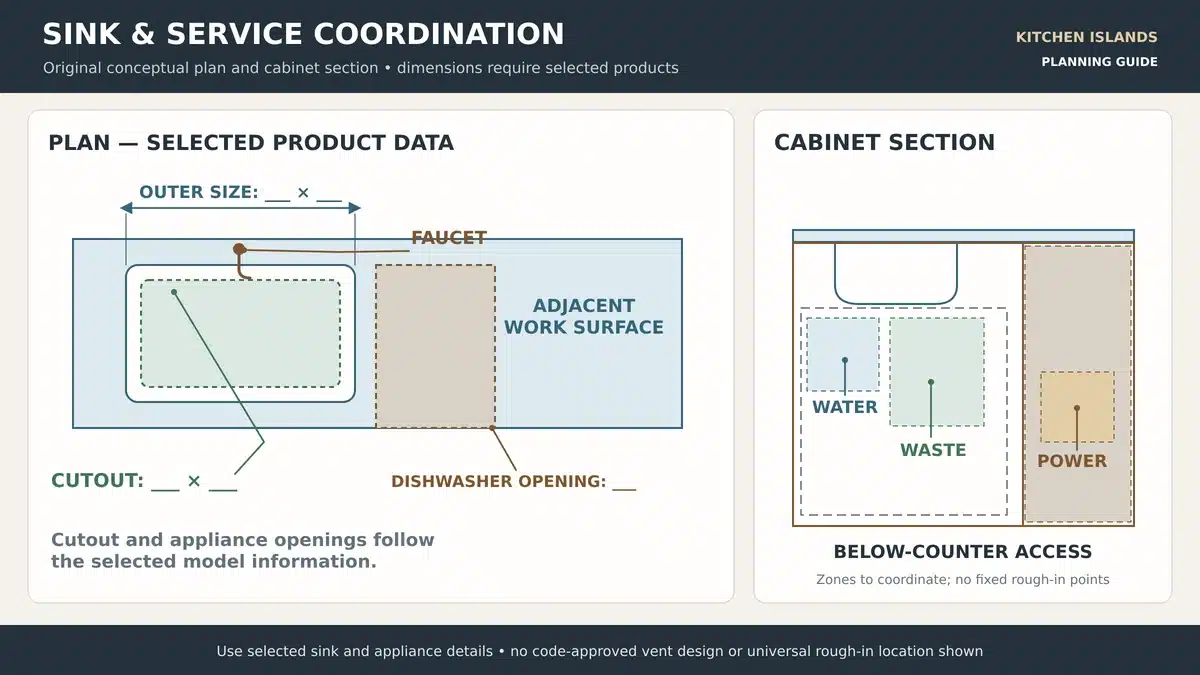
Plot the sink’s outer dimensions, mounting method, cutout, faucet holes and required cabinet opening. Below the top, reserve room for the waste, traps, filters or disposal if specified. Check access for service and replacement as well as initial fit.
Locate a dishwasher so its open door and a person loading it can be accommodated. Protect useful landing and preparation surfaces beside the sink. A large basin can divide a compact island into small areas, so compare the remaining uninterrupted top with the work you expect to do there.
Coordinate services before fixing the cabinet layout
Confirm water, drainage, venting, electrical supplies and any cooking ventilation with the responsible project team. Show service positions relative to the same datum used for the cabinets. Resolve access panels and service routes before fabrication; the approach depends on the building and equipment.
The kitchen cabinet project scope connects island cabinets with worktops, sinks, appliances and services. Specify who supplies each item and who verifies site conditions, installs it and approves the interfaces.
Verify the measurements before fabrication
Test the full layout on the floor
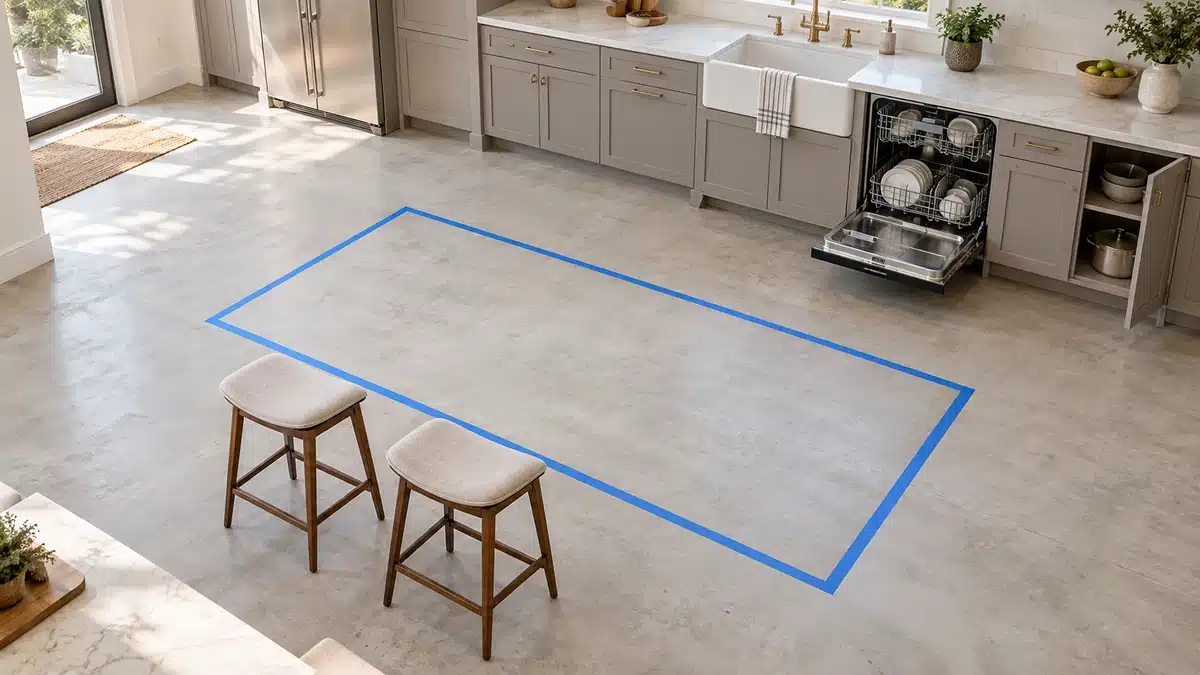
Mark the finished countertop perimeter with removable tape. Add cabinet doors, appliance openings and the seating zone. Walk through preparation, loading the dishwasher and passing the island. Check the route with the intended number of users rather than testing only an empty room.
Raise the survey to the countertop level where necessary to see how overhangs, handles or a raised seating section affect space. A floor outline is useful for scale but cannot reveal every collision above floor level.
Complete the final measurement checklist
- Confirm finished room dimensions, wall positions and floor levels against the current site condition.
- Record cabinet box sizes, fronts, backs, end panels, fillers and finished top dimensions separately.
- Check the narrowest work aisle, end passage and seating route with all projections included.
- Show clear seating frontage, knee space, stool positions and countertop support.
- Coordinate exact sink and appliance models, openings, service positions and access requirements.
- Agree countertop thickness, edges, joints, cutouts, templating and the delivery route.
- Record the drawing revision, remaining site checks and responsibility for fabrication release.
Keep dimensions and finish choices connected through drawing and sample coordination. Use the shop drawing approval process to control revisions and release status. The material sample approval process records the agreed appearance; a sample does not verify the island’s fit.
Kitchen island measurement questions
Is there a standard kitchen island size
There is no universal length or depth. Choose the finished countertop footprint from the available room, required aisles, cabinet assembly and intended functions. Treat example sizes as options to test rather than dimensions to copy.
Can a 6 foot island seat three people
It may, if the full 72-inch side provides three clear 24-inch seating zones. Supports, waterfall panels and corner arrangements can reduce that space. Check knee depth and the passage behind occupied stools before confirming the seat count.
Is 36 inches enough between an island and cabinets
The guide’s 36-inch walkway reference applies to a passage without active work. An aisle facing working counters or appliances should be assessed as a work aisle. Test the actual doors, users and route instead of applying one spacing number everywhere.
Can a 36 inch deep island include dining seats
It depends on the assembly. A full-depth cabinet row, finished back and dining knee space can require a deeper top. A shallower cabinet design might fit, but storage, support and seating need to be drawn together.
How big should an island with a sink be
Use the actual sink and cabinet requirements, then retain useful adjacent work surfaces and fit the appliance and plumbing interfaces. A sink model, dishwasher position and the surrounding aisles are more reliable inputs than one generic island length.
Coordinate your island with the kitchen package
Skyland Building coordinates cabinetry product selection, drawings, samples and supply requirements around the agreed project scope. Share the room plan, proposed island functions, available site measurements and exact appliance information so the cabinet and countertop interfaces can be reviewed.
Send your kitchen plans and island measurements with quantities, finish references, project location and target delivery requirements. Site measurement and installation responsibilities should be agreed for the selected package.