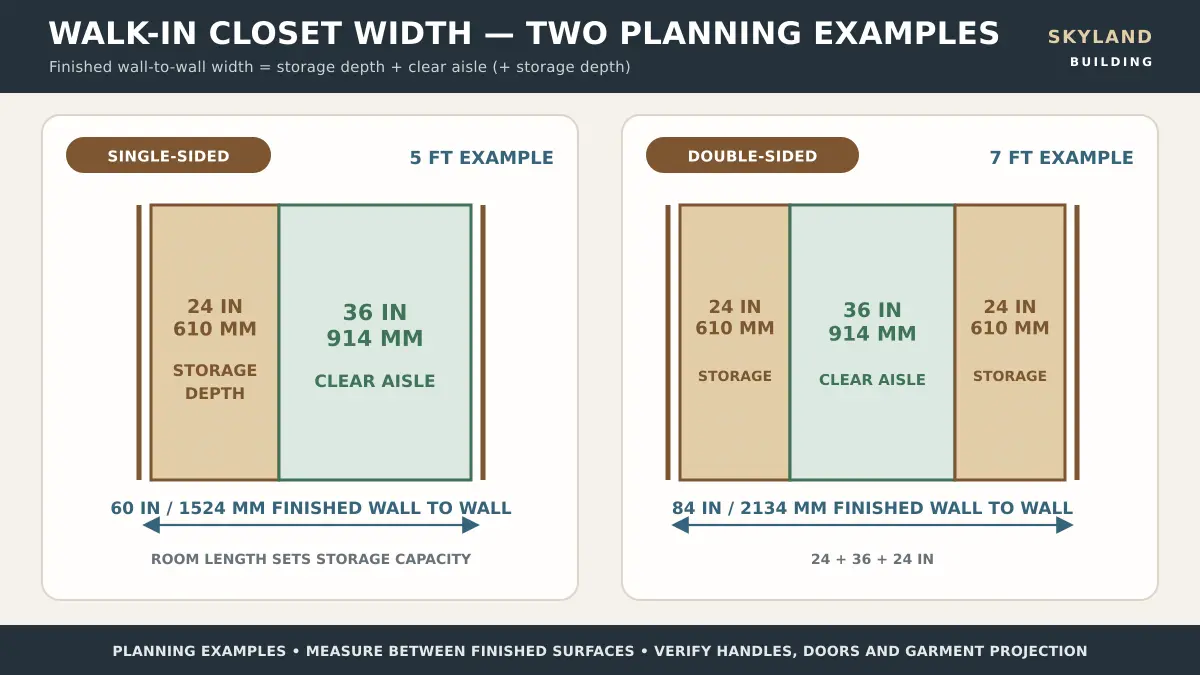
A practical single-sided walk in closet often needs about 5 feet or 1524 mm of clear room width: approximately 24 inches or 610 mm for hanging storage plus a 36 inch or 914 mm aisle. Storage on two facing walls usually needs about 7 feet or 2134 mm: 24 inches of storage, a 36 inch aisle and another 24 inches of storage. These are useful planning calculations, not universal minimums.
This guide explains walk-in closet dimensions by layout, including storage depths, aisle widths, drawers, doors, islands, hanging heights, measurement and accessibility considerations. For a project-specific layout, compare these ranges with the room survey and the drawings for Skyland bespoke wardrobe and closet systems.
Quick Answer
For one wall of full-depth hanging storage, start with about 60 inches or 5 feet of clear room width if a 36 inch aisle is desired. For full-depth storage on both sides, start with about 84 inches or 7 feet. A 4 by 4 foot room may allow someone to step inside, but a 24 inch hanging zone leaves only about 24 inches of floor width and usually feels constrained. Islands require substantially more space because clear aisles must remain on every working side.
Written by Winston, Project Director at Skyland Building · 10+ Years of Building Materials Experience
Updated October 2026 · 17-minute read
Key Takeaways
• Calculate the room from storage depth and the clear aisle instead of relying on square footage alone.
• A practical single-sided layout often starts near 5 feet wide; opposing full-depth storage usually starts near 7 feet wide.
• A 36 inch aisle is a useful daily-use target, while 30 inches is compact and 24 inches is highly constrained.
• Open drawers, hinged doors, pull-outs, handles and hanging garments can reduce the measured aisle.
• Islands need clear space on all working sides; calculate the complete cross-section before adding one.
• Final dimensions must come from finished site measurements and the approved cabinet system, not a nominal room label.
Standard Walk In Closet Dimensions at a Glance
The table uses common planning references for a 24 inch or 610 mm full-depth hanging zone and a 36 inch or 914 mm clear aisle. A shallower shelf wall can reduce the required total, while doors, drawers, trim and installation tolerances can increase it.
| Layout | Planning dimension | What the room can support |
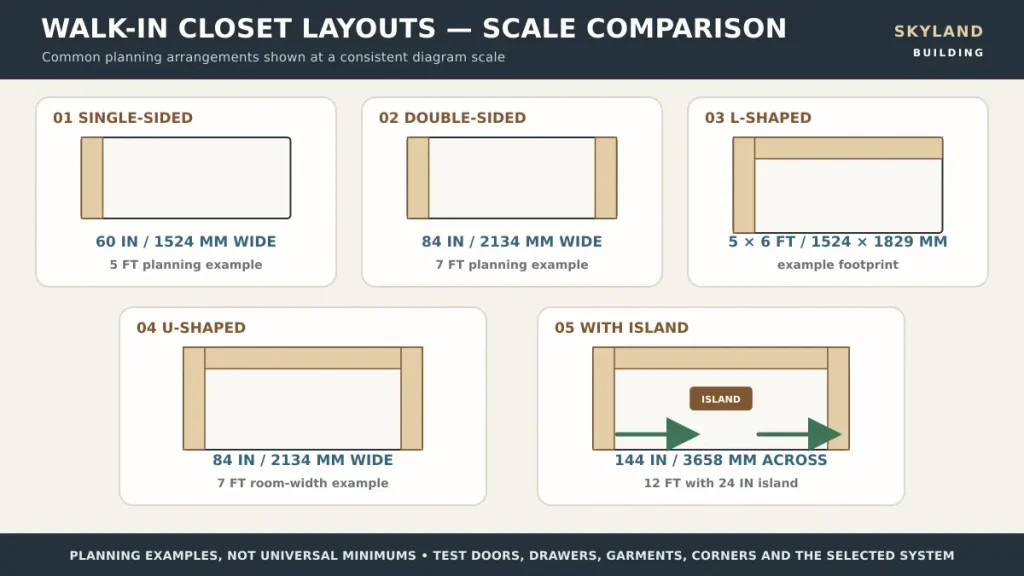
| Single-sided | About 60 in or 5 ft clear width 1524 mm | One 24 in hanging wall plus a 36 in aisle; room length sets storage capacity |
| Double-sided or galley | About 84 in or 7 ft clear width 2134 mm | Two 24 in storage walls plus a 36 in center aisle |
| L-shaped | Often from about 5 by 6 ft 1524 by 1829 mm | Full-depth storage on one wall and a shallower or carefully resolved return |
| U-shaped | Usually at least 7 ft clear width 2134 mm | Opposing storage plus a rear wall; depth and corner access must be tested |
| Island layout | Often about 12 ft across with a 24 in island 3658 mm | 24 in storage plus 36 in aisle plus 24 in island plus 36 in aisle plus 24 in storage |
Calculate Room Width From Storage and Aisles
Walk-in closet size is easier to understand as a cross-section than as an area. Start with the deepest element on each side, add the clear aisle, then include doors, handles, fillers and installation tolerances where they project beyond the cabinet face. Measure between finished surfaces, not rough framing.
Single Sided Layouts
A single-sided layout uses one main storage wall and keeps the opposite wall open. With about 24 inches of hanging depth and a 36 inch aisle, the clear room width is about 60 inches. The room can be narrower if the storage is shallow or the aisle is reduced, but a 48 inch room with 24 inch hanging space leaves only 24 inches of passage. For a narrow room, compare a single storage run with Skyland custom cabinetry and wardrobes before adding a second shallow unit that compromises circulation.
Double Sided Layouts
A double-sided or galley layout uses two facing storage walls. The practical calculation is 24 plus 36 plus 24 inches, which equals 84 inches or 7 feet of clear width. Reducing the aisle to 30 inches lowers the total to 78 inches or 1981 mm, but the room becomes more restrictive when a person opens a drawer or another user passes through. If one side contains only 14 to 16 inch shelves, use the actual shallower depth in the calculation.
L Shaped Layouts
An L-shaped closet uses two adjoining walls and can suit a compact corner without requiring two full-depth runs to face each other. Put the deeper hanging zone on the longer wall and consider shallower shelves or drawers on the return. The inside corner needs deliberate treatment so hanging clothes, shelves, doors and handles remain reachable. Coordinate the closet with surrounding bespoke millwork and cabinetry when wall panels, flooring or adjacent built-ins meet the same corner.
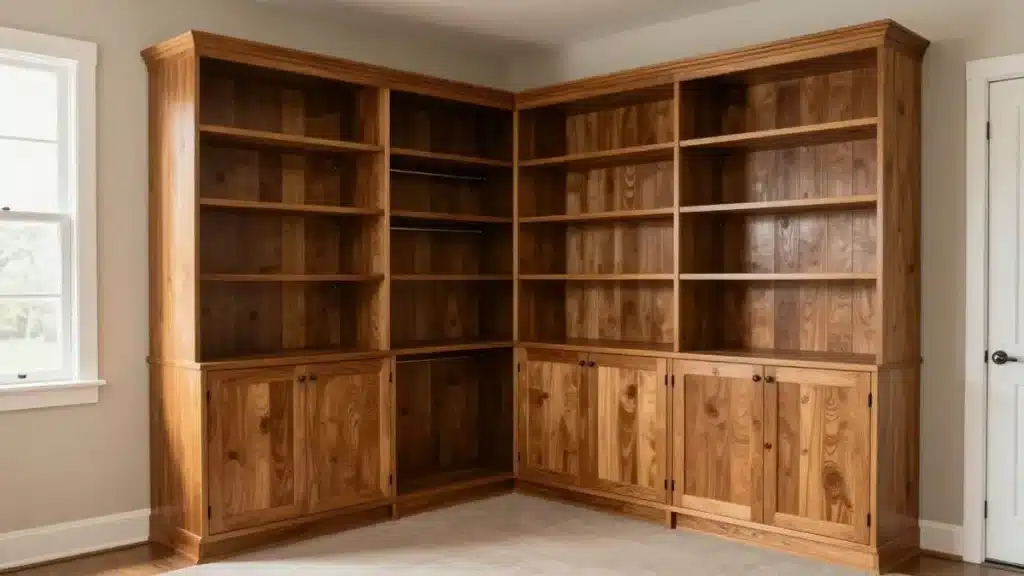
A corner cabinetry layout shows why shelf depth door operation and the inside junction must be coordinated as one composition.
U Shaped Layouts
A U-shaped layout places storage on three walls. The width still follows the same opposing-storage calculation, so two 24 inch side runs and a 36 inch aisle need about 7 feet. The room also needs enough depth for the rear storage, entry and usable corners. A U can add capacity, but it does not automatically improve access if drawers or long garments crowd both corners.
Island Layouts
Calculate an island from one finished storage face to the opposite finished storage face. With 24 inch storage on both walls, 36 inch aisles on both sides and a 24 inch island, the room needs about 144 inches or 12 feet across. A 30 inch island increases the calculation to 150 inches or 12 feet 6 inches. Check every drawer in its open position; a smaller movable bench may be more useful when the room cannot preserve working clearances on all sides.
Closet Depths Shelves Rods and Drawers
Storage depth should follow the object and the selected cabinet system. The room dimension must use the finished outer face, while the storage brief should also record the usable internal depth. A door, back panel, front frame or lighting profile can reduce internal capacity without changing the nominal cabinet size.
| Storage element | Planning range | What to verify |
| Hanging clothes | 22 to 24 in 559 to 610 mm | Hanger width, garment bulk, doors and the finished cabinet face |
| Folded clothing shelves | 12 to 16 in 305 to 406 mm | Item size, visibility, reach and whether a door is fitted |
| Shoe shelves | 12 to 14 in 305 to 356 mm | Shoe size, angle, toe projection, boots and adjustable spacing |
| Drawer cabinets | 18 to 24 in 457 to 610 mm | Usable drawer depth, runner system, handle and full open projection |
| Island or dresser | 24 to 36 in deep 610 to 914 mm | Drawer direction, top use, power, seating and clear aisle on every side |
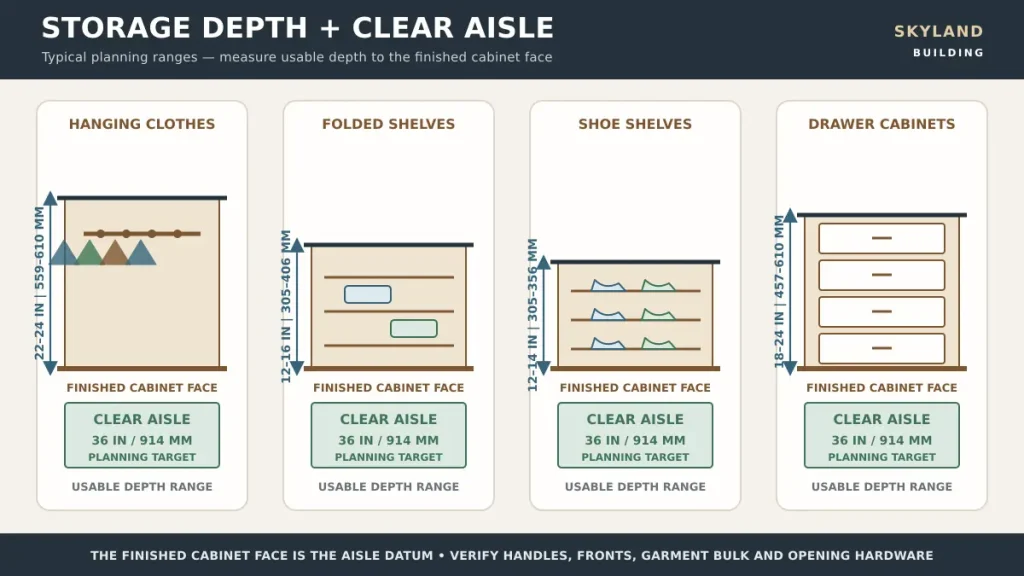
Hanging Depth and Garment Clearance
About 24 inches is a common starting depth for adult garments hanging across a rod. Some systems use a slightly shallower carcass or open rail, but sleeves and hangers may extend beyond it. Measure representative garments and confirm whether doors close without compressing clothing. Long coats and bulky outerwear may need more depth or a different rail position than shirts.
Shelf and Shoe Depth
Folded clothes often work on shelves about 12 to 16 inches deep. Shoe shelves commonly begin near 12 to 14 inches, but large shoes, boots, angled shelves and display spacing can change the result. An unnecessarily deep shelf hides items at the back and consumes aisle width; an undersized shelf allows items to project into the passage.
Rod Heights and Vertical Zones
Use the actual garments and user reach to set rod heights. For early planning, double-hang sections often place rods around 40 and 80 inches or 1016 and 2032 mm above the floor, while long-hang sections may need about 60 to 70 inches or 1524 to 1778 mm of clear vertical space. These are starting ranges, not fixed standards. Leave room for the upper shelf, garment length, floor clearance, lighting and any pull-down mechanism.
Drawers Doors and Pull Outs
The closed cabinet depth does not show the full operating envelope. Record drawer extension, hinged-door swing, lift-up action, pull-out hamper depth, trouser-rack travel and handle projection. Opposing drawers can collide even when the center aisle looks adequate on a simple plan. Use exact cabinet hardware specifications before drilling, runner selection and internal divisions are released.

Hanging clothes folded items and shoes use different depths and vertical spacing, so one repeated shelf module rarely serves every category equally well.
Walk In Closet Aisle Clearances
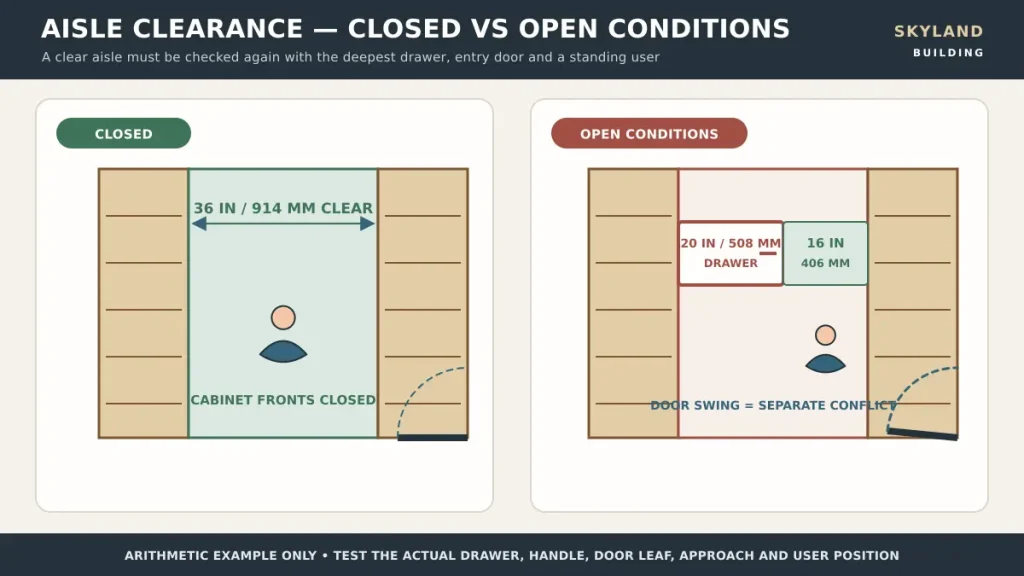
An aisle should be measured between the finished faces of storage, trim, handles or any other fixed projection. It should also be tested in use, because an open drawer or door can temporarily reduce the route. The following figures are planning references rather than universal building-code minimums.
| Clear aisle | Planning use | Main limitation |
| 24 in 610 mm | Highly constrained step-in passage | Little room to turn, pass or use a full-extension drawer |
| 30 in 762 mm | Compact single-user aisle | Check body space, garments, handles and every open front |
| 36 in 914 mm | Practical everyday planning target | May still be reduced by opposing drawers or two users |
| 42 to 48 in 1067 to 1219 mm | Shared use or more comfortable dressing | Requires more overall room width and still needs open-drawer testing |
Open Drawer Standing Space
A person needs room to stand after the drawer has extended. If a 20 inch drawer opens into a 36 inch aisle, only 16 inches remain between the open front and the opposing surface. That does not necessarily make the drawer unusable, but it changes how the user stands and whether another person can pass. Draw the open position rather than assuming the closed aisle is sufficient.
Entry Door and Cabinet Door Clearances
An inward-swinging entry door can occupy the most valuable part of a compact closet. Show the full leaf and handle swing, then check it against hanging clothes, drawers and cabinet fronts. A sliding or pocket door can preserve floor area, but it still needs wall, track, handle and maintenance coordination. Cabinet doors should not trap the user behind the entry door or block the only route out when open.
Island and Seating Clearances
Measure from the island face to the surrounding cabinet face on each side; do not measure from the room centerline. Check the deepest drawer and the side from which a person will use it. Seating adds pull-back and circulation space, and a stool that lives in the aisle can be more disruptive than the island itself.
What Common Room Sizes Can Hol
Room labels help only when the layout is stated. The examples below assume finished interior dimensions and are intended to screen options before a detailed plan. A door, window, sloped ceiling or deeper cabinet can change the result.
Four by Four Foot Rooms
A 4 by 4 foot room is best treated as a constrained step-in closet. One 24 inch hanging wall leaves about 24 inches of clear width. Use shallow shelves, open storage or a carefully placed hanging run; avoid describing the room as comfortable for two-sided storage, drawers facing the passage or a dressing function.
Five by Five Foot Rooms
A 5 by 5 foot room can support a practical single-sided layout with about 24 inches of storage and 36 inches of aisle. A shallow return may create an L-shaped arrangement, but full-depth cabinets on both sides would leave only about 12 inches between them. Entry placement is critical because a hinged door can consume much of the open floor.
Six by Six Foot Rooms
A 6 by 6 foot room gives more length and flexibility for a single-sided or L-shaped closet. Two opposing 24 inch storage runs leave about 24 inches in the center, so a fully double-sided layout remains tight. A better plan may use one full-depth hanging wall and a shallower shelf or shoe wall opposite.
Seven Foot Wide Rooms
At about 7 feet of clear width, two 24 inch storage walls and a 36 inch center aisle can fit. Additional width improves shared use and open-drawer clearance. The room length then controls whether the plan remains a galley, turns into a U shape, or accommodates a mirror, bench or dressing zone at the end.
Ten by Ten Foot Rooms and Larger
A 10 by 10 foot room can support generous perimeter storage and a dressing area, but it does not automatically fit a useful island with 36 inch aisles and full-depth storage on every side. Apply the complete cross-section formula to the island direction. Many island layouts work better at about 12 feet across or when one wall and the island are shallower.
How to Measure a Walk In Closet
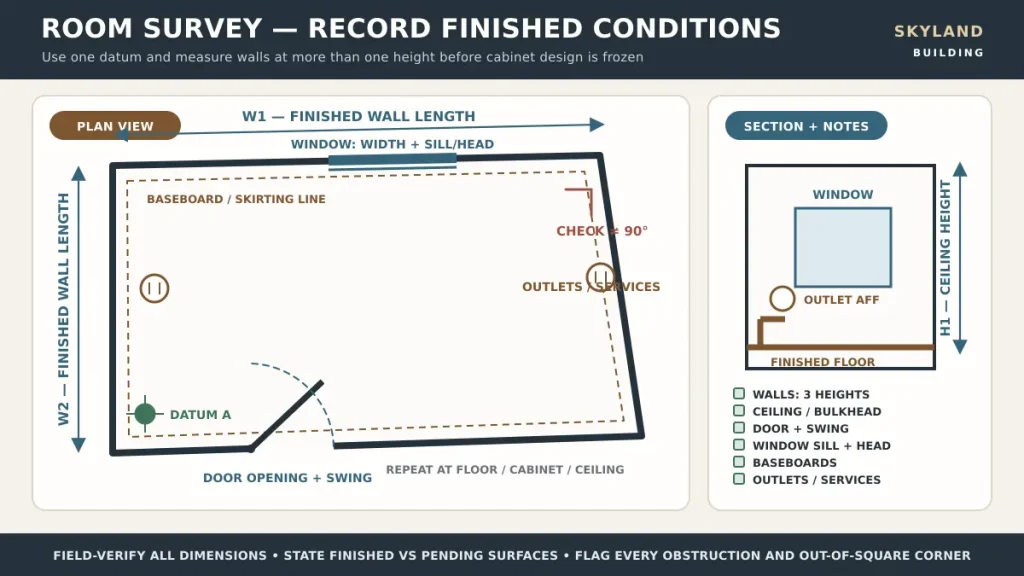
Measure the finished room at more than one height, then compare it with the selected storage system. Label every dimension by reference surface and keep photographs or sketches with the survey. Skyland drawing and sample coordination can connect room information, cabinet drawings and finish references for project packages.
Measure Finished Wall Lengths and Height
1. Measure each wall at floor level, cabinet or rail height and near the ceiling. Record the shortest usable dimension when walls are bowed or not parallel.
2. Measure ceiling height in several locations and note bulkheads, beams, sloped ceilings, access panels and sprinkler or service zones.
3. State whether every number is a finished dimension or still depends on plaster, wall panels, skirting, flooring or ceiling work.
Record Doors Windows and Obstructions
4. Measure the entry opening, frame and full door swing, including the handle and the wall area required by a pocket or sliding system.
5. Locate windows, trim, baseboards, outlets, switches, vents, access panels, mirrors and any fixed service that must remain reachable.
6. Check corners for out-of-square conditions and record floor-level changes that affect plinths, fillers or full-height panels.
Test the Selected Storage System
7. Place the exact cabinet depths, fillers, end panels, doors, handles and lighting profiles on a scaled plan rather than using only nominal module sizes.
8. Draw every door, drawer and pull-out in the open position. Mark the remaining clear route and the standing position required to use each item.
9. Verify the installation and delivery route, including room entry, corridors, lifts, stairs and the size of any preassembled panels or units.
Accessible and Adaptable Closet Planning
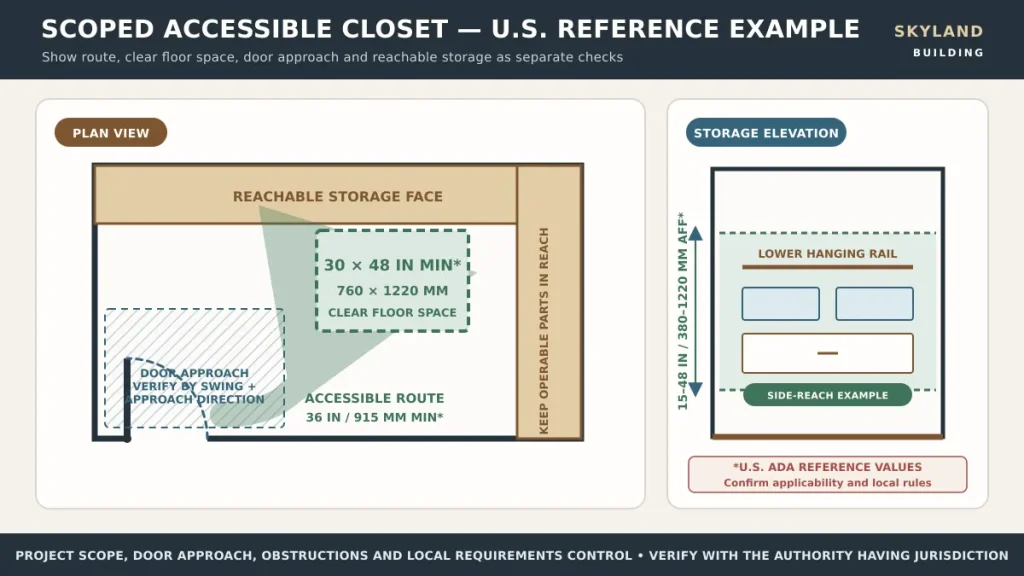
Accessibility requirements depend on the project type, jurisdiction and scope. Do not label a closet accessible from one aisle dimension alone. The responsible design professional should verify the route, door, maneuvering space, clear floor space, reach, hardware and storage types against the applicable standard.
Doors Routes and Clear Floor Space
Under U.S. Access Board guidance, a door serving a walk-in closet provides user passage and is subject to the applicable door provisions when the space is required to be accessible. Storage also needs an appropriate clear floor or ground space and operable parts within the applicable reach. A 30 by 48 inch clear floor space is a common accessibility module, but the complete room and approach must be evaluated rather than inserting that rectangle into an otherwise unusable plan.
Reachable Storage and Hardware
Where accessible storage is required, at least one of each provided storage type may need to comply with the applicable provisions. Unobstructed reach ranges in the 2010 ADA Standards extend from 15 to 48 inches above the finished floor, but obstructions can change the permitted reach. Place essential shelves, rods, drawers and controls within the verified range and choose hardware that can be operated as required.
Adaptable Storage for Changing Needs
Even when a formal accessibility requirement does not apply, adjustable shelves, movable rods, pull-down fittings, low-force drawers and a clear entry can support users with different heights and abilities. Avoid fixing every essential item above easy reach or behind a narrow turn. Keep future modification points visible in the drawings and installation record.
Materials Lighting and Ventilation
Dimensions alone do not make a usable closet. Cabinet construction, surface finish, lighting, power, ventilation and cleaning access affect the finished depth and daily performance. Coordinate these items before production because late additions can consume aisle width or require visible changes to panels.
Cabinet Construction and Finishes
Confirm carcass thickness, back panels, edge treatment, door construction, glass or metal profiles, fillers, scribes, skirting and top closure. A reference image does not define substrate, sheen, grain direction or acceptable variation. Review physical finishes through a controlled material sample approval process that identifies the room and cabinet marks covered by the decision.
Lighting and Electrical Coordination
Plan ambient light and internal cabinet lighting together. Show profiles, sensors, switches, color temperature, power supplies, cable routes and driver access on the drawings. Keep fittings away from garments and allow maintenance without dismantling finished cabinetry. Outlets for a dressing table, iron, charging drawer or powered accessory also need defined locations and ventilation where required.
Ventilation Moisture and Cleaning
A closed dressing room can trap heat, odors or humidity, especially next to a bathroom. Confirm the room ventilation strategy, door undercut or transfer path, and any mechanical requirements with the local project team. Leave cleaning access at floors, corners, mirrors and around freestanding features; a narrow gap that cannot be cleaned is not useful circulation space.
From Room Plan to Approved Wardrobe Package
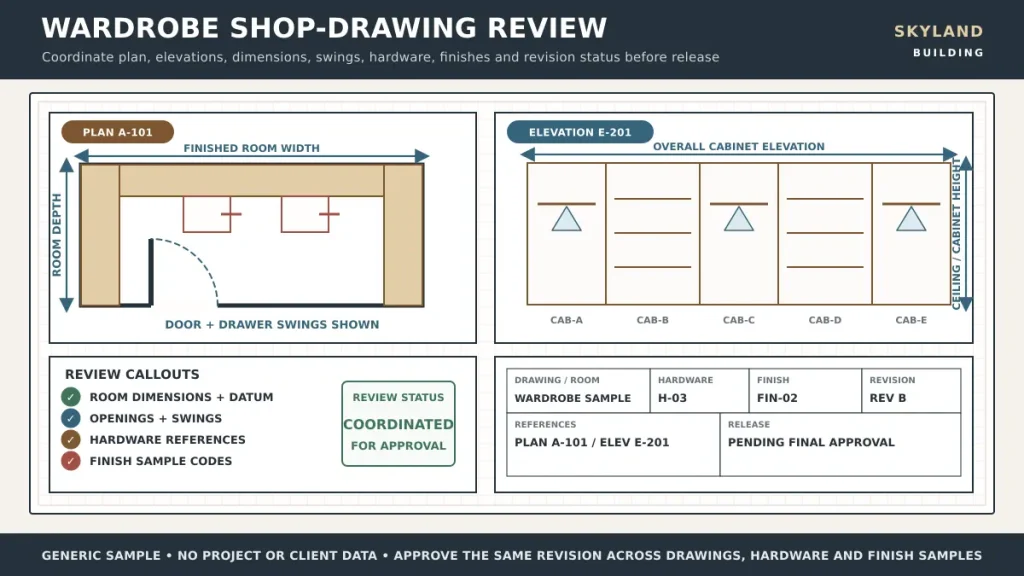
A reliable wardrobe package should connect the room survey, plan, elevations, cabinet marks, internal storage schedule, hardware list, finish references, lighting information and installation conditions. The shop drawing approval process should resolve dimensions, interfaces and operating clearances before panels are cut or hardware drilling is released.
Before ordering, reconcile the drawings, exact materials, samples, hardware, quantities, inspection criteria, packing marks and delivery sequence through a documented design freeze checklist. A final room measurement does not approve the finish, and an approved finish sample does not confirm the cabinet dimensions.
Pre Order Walk In Closet Checklist
• Finished wall lengths, ceiling heights, floor levels, corners and all obstructions have been surveyed.
• The layout formula includes the finished storage depth, clear aisle, island and every fixed projection.
• Doors, drawers, hampers, shoe racks, trouser racks and other pull-outs have been checked in the open position.
• Hanging heights, shelf depths, shoe storage and drawer sizes match the actual items and users.
• Entry-door operation, windows, switches, outlets, vents, sprinklers, access panels and lighting are coordinated.
• Carcass, fronts, glass or metal profiles, edges, fillers, skirting, top closure and visible finishes are defined.
• Hardware models, drilling, load basis, opening angles, runner extensions and replacement access are confirmed.
• Plans, elevations, cabinet marks, finish references, sample status and drawing revision agree.
• Delivery route, package dimensions, room labels, installation sequence and site-readiness requirements are recorded.
For a multi-room villa, apartment, hotel or residential package, connect the wardrobe schedule to the whole house building materials checklist so room quantities, approvals, packing and delivery stages remain visible.