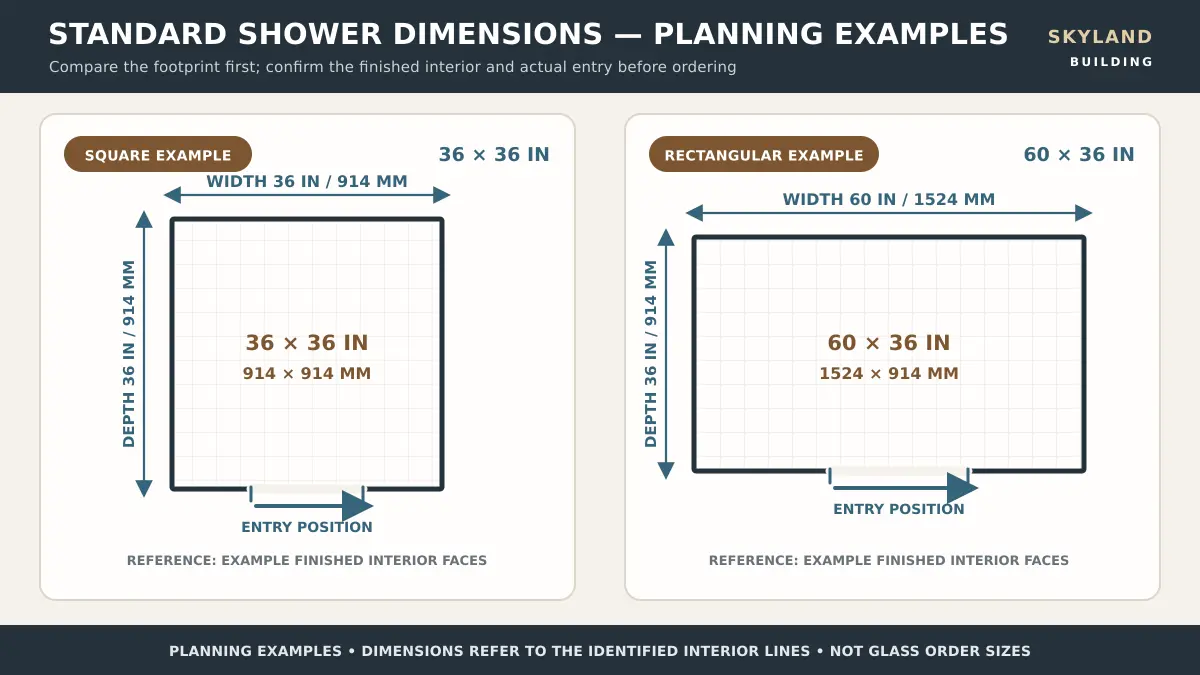
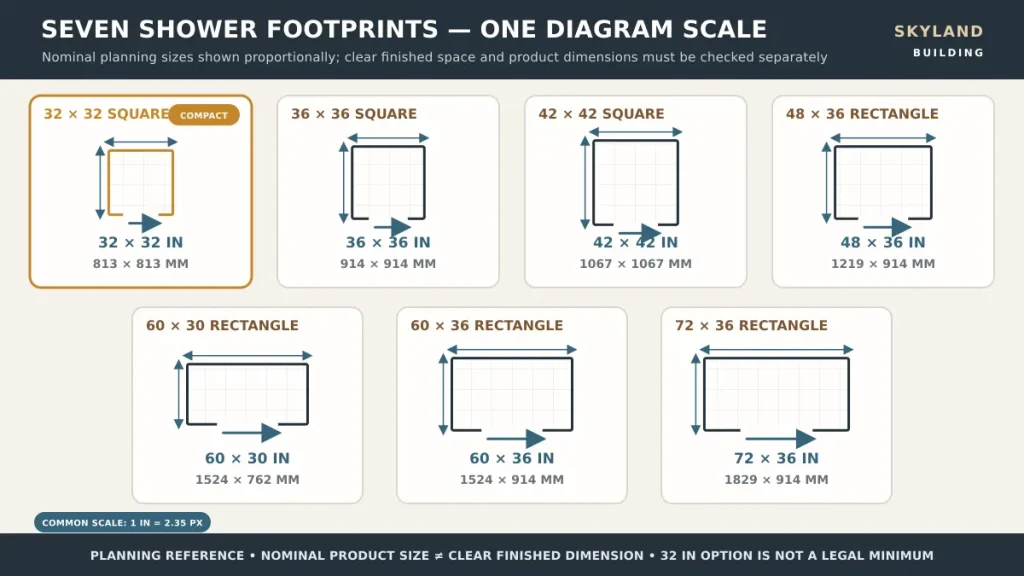
Common standard shower dimensions include 32 × 32 and 36 × 36 inches for square stalls, plus 48 × 36, 60 × 30 and 60 × 36 inches for rectangular layouts. A 36 × 36-inch shower is a useful starting point for comparison; a 60 × 36-inch layout gives more length for entry and movement. These are planning footprints, not guaranteed clear interior sizes or universal code minimums.
Choose a shower size by checking the finished inside space, the tray or floor assembly and the actual entry opening. A nominally large enclosure can still feel tight when a bench projects into it or a sliding door leaves a narrow entrance. This guide compares common sizes in inches and millimeters, then explains what to measure before ordering.
Written by Winston, Project Director at Skyland Building · 10+ Years of Building Materials Experience
Updated October 2026 · 14-minute read
Standard shower size chart
Use the following chart to compare proportions during early bathroom planning. The two dimensions describe a footprint; confirm the orientation and measurement reference on the selected product drawing. Millimeters are direct inch conversions rounded to the nearest whole millimeter.
| Planning layout | Footprint in inches | Converted millimeters | Main check |
| Compact square | 32 × 32 in | 813 × 813 mm | Space-limited layout; check clear interior |
| Square | 36 × 36 in | 914 × 914 mm | Starting point for enclosure comparison |
| Larger square | 42 × 42 in | 1067 × 1067 mm | More turning space than a 36 inch square |
| Rectangular | 48 × 32 in | 1219 × 813 mm | Longer footprint with a compact depth |
| Rectangular | 48 × 36 in | 1219 × 914 mm | Compare entry location and door type |
| Tub-alcove proportion | 60 × 30 in | 1524 × 762 mm | Verify drain and finished-wall conditions |
| Alcove | 60 × 32 in | 1524 × 813 mm | Model-specific base and enclosure fit |
| Alcove or walk in | 60 × 36 in | 1524 × 914 mm | Longer layout; assess screen and entry |
| Larger rectangular | 60 × 42 in | 1524 × 1067 mm | Consider seats and surrounding circulation |
| Extended rectangular | 72 × 36 in | 1829 × 914 mm | Larger room or custom layout comparison |
A 900 mm square tray is a metric product size, not an exact equivalent of a 36 inch tray. Likewise, 1200 × 900 mm is not identical to 48 × 36 inches. Keep the supplier’s actual units and dimensions on the approved drawing instead of rounding an order to a convenient metric module.
What standard shower dimensions actually measure
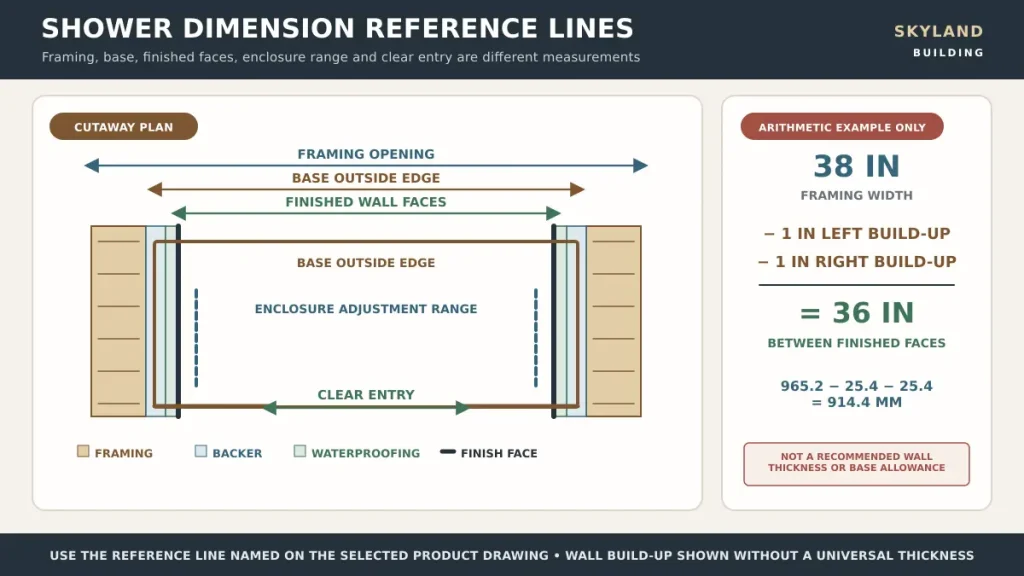
Size labels are useful for shortlisting, but the same label can describe different reference lines. Start with the complete assembly when comparing shower enclosures, rather than assuming that the tray, glass and clear entry all share one measurement.
Nominal size and outside base dimensions
A nominal size identifies a product family or catalog option. The base drawing should show its actual overall width and depth, flange, threshold and drain coordinates. Glass may sit inside the outside edge of the base, and a corner enclosure may lose standing area at an angled entrance. Request the dimensional drawing for the exact model.
Rough opening and finished inside dimensions
The rough opening is measured before the wall finishes are complete. Backer board, waterproofing, adhesive and tile or panels reduce that space. The clear finished dimension is measured between the relevant completed interior faces; it determines how much usable space remains.
Worked example: a 38 inch framing width with a 1 inch total build-up on each opposing wall leaves 36 inches between finished faces. In millimeters, 965.2 − 25.4 − 25.4 = 914.4 mm. This is an arithmetic example, not a recommended wall thickness or a base installation allowance.
Enclosure adjustment range and clear entry
An adjustable enclosure has a stated installation range. Record the measured opening at the heights required by its instructions and compare every relevant value with that range. Do not substitute the smallest reading for a complete survey when the walls are tapered or out of plumb. The glass supplier must confirm whether standard adjustment is sufficient.
Clear entry is the unobstructed passage when the door is open or the screen is installed. Tracks, hinges, overlapping panels and handles can reduce it. Record this separately from the overall enclosure width.
Shower dimensions by layout
Square showers for compact bathrooms
A 32 × 32-inch footprint can suit a space-limited plan, but compare the finished standing space and the door opening before selecting it. A 36 × 36-inch option provides an additional 4 inches in each direction. Test turning, bending and reaching the controls on a taped-out footprint; user needs matter more than the catalog label.
Rectangular and alcove showers
Rectangular footprints such as 48 × 36 or 60 × 36 inches give more length to position the entrance and fittings. An alcove has three enclosing walls, so wall-to-wall measurement and the front threshold or glass line need separate checks. A 60 × 30 or 60 × 32-inch base may help with a tub-to-shower conversion, but an existing bath opening does not establish drain compatibility or final glass dimensions.
Corner and neo angle showers
A square corner enclosure uses two adjoining walls. A neo-angle enclosure clips the front corner to create an angled entry. Compare its actual internal geometry and door path; two bases with the same outside width and depth can provide different standing areas. Check the wall angle, support locations and space for the hardware.
Walk in shower dimensions
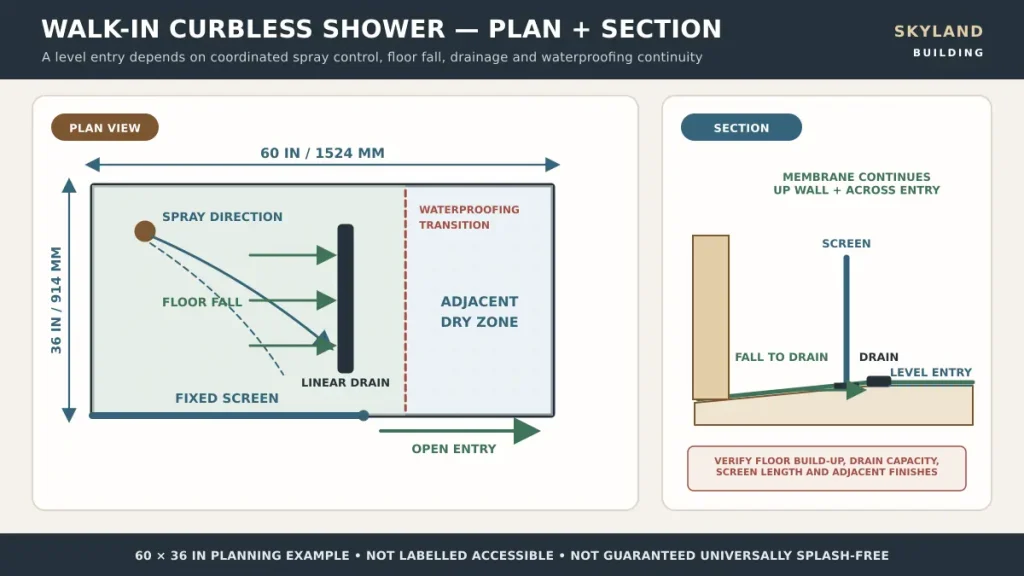
Walk-in describes an entry arrangement rather than one fixed size. A 60 × 36-inch footprint is a useful rectangular example to test, while a smaller or larger layout may suit the room. A fixed screen, entry gap and showerhead position determine how water reaches the opening. A footprint alone cannot establish that an open shower will contain splash.
Mark the spray direction, screen and approach route on a plan. Allow for reaching the controls, cleaning behind fittings and any seat. If the entry must remain open, review the wet zone and drainage with the installer before freezing the screen dimensions.
Curbless shower dimensions
Curbless means the entrance has no raised curb. It does not automatically mean wheelchair accessible. The floor fall, drain height, waterproofing and transition to the bathroom floor need a coordinated section. Existing floor structure may limit the available build-up or recess, especially in a renovation.
Choose the footprint alongside the drainage and water-containment design. A larger screen or different showerhead position may improve containment, but the detail must work with the actual room and selected system.
For a wider bathroom or villa package, use Skyland’s product selection guides to compare dimensions, installation interfaces and maintenance alongside appearance.
Shower tray base and drain dimensions
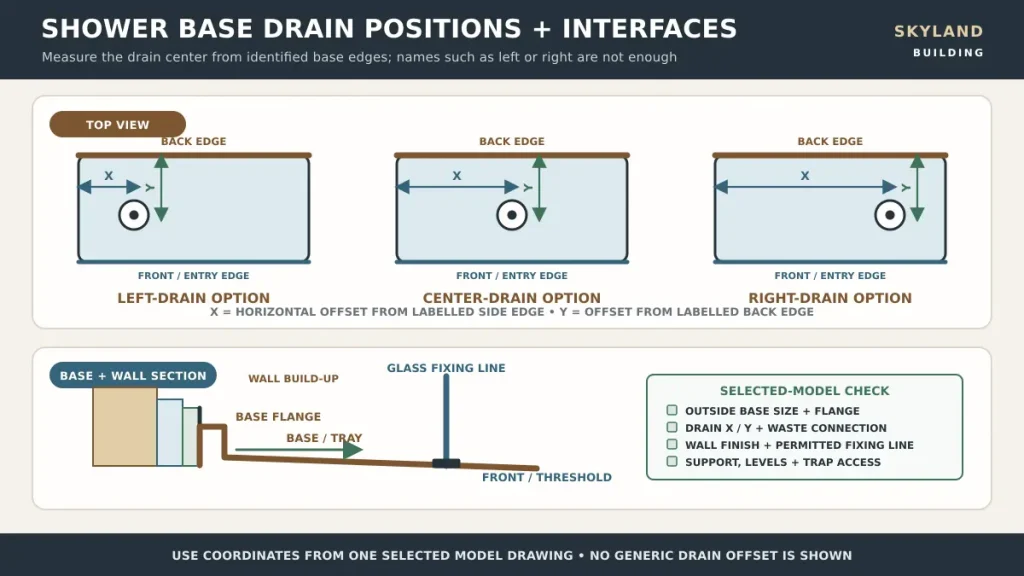
A tray or base is part of an assembly. Confirm its installation type, outside dimensions, flange, supported areas, threshold and drain location against the finished wall and enclosure details. A single-threshold alcove base and a double-threshold corner base are not interchangeable simply because their catalog footprints match.
| Dimension or interface | What to record |
| Overall base width and depth | Exact drawing dimensions and stated tolerances |
| Drain position | Center coordinates from identified reference edges; waste connection |
| Threshold and flange | Height, profile and junction with wall waterproofing |
| Glass mounting line | Fixing surface, permitted drill zones and enclosure compatibility |
| Floor build-up | Support, finished levels, drain access and installation detail |
Left, right and center drain options should be compared using coordinates, not names alone. Record which side is the front and how the manufacturer defines left and right. Confirm trap access and the existing waste position before assuming that a standard base avoids plumbing changes.
Add these references to your bathroom fixture specifications so the base, waste, glass and concealed fittings remain linked to one room and drawing revision.
Shower door entry and bathroom clearances
Hinged pivot and sliding shower doors
Draw the actual swing arc for a hinged or pivot door, including its handle. Check both the shower interior and the bathroom side for contact with a toilet, vanity, towel rail or room door. The opening direction must follow the product instructions and applicable local rules.
A sliding door avoids an outward swing, but overlapping panels reduce the clear entry. Ask for the model’s passage opening rather than estimating it as half the enclosure width. Check track cleaning access and whether the moving panel can travel fully.
Space outside the shower
Review the approach and exit with nearby doors and vanity drawers open. A shower that fits its own footprint can still obstruct the bathroom route. Local fixture and circulation requirements need to be assessed on the whole room plan; a generic shower size chart cannot establish those clearances.
Shower height controls and benches
Enclosure height, room ceiling height and showerhead height are separate dimensions. Measure from the specified finished-floor or base reference and note soffits, sloping ceilings and support bars. There is no single height that defines every standard shower; choose the exact enclosure and set outlet heights for the users and the applicable requirements.
A bench reduces the remaining standing zone. Show its projection and the clear floor space separately. Keep controls reachable from the intended approach or seating position and confirm access to concealed valves for servicing.
Review the valve depth, outlet positions and water conditions when choosing shower systems. The visible trim should fit the concealed body and finished-wall build-up.
Minimum shower dimensions and accessibility
Local minimums and US residential code examples
A code minimum and a comfortable planning size serve different purposes. As one US example, the 2018 International Residential Code Section P2708.1 sets a general shower interior area of at least 900 square inches and a minimum finished interior dimension of 30 inches. Exceptions and other provisions apply. Confirm the locally adopted edition and amendments before using those figures on a project.
Do not treat a nominal 30 × 30-inch base as automatic proof of compliance. The finished interior, enclosure geometry and applicable provisions need to be checked. For everyday use, compare larger footprints where the room permits and assess the intended users directly.
US ADA transfer and roll in showers
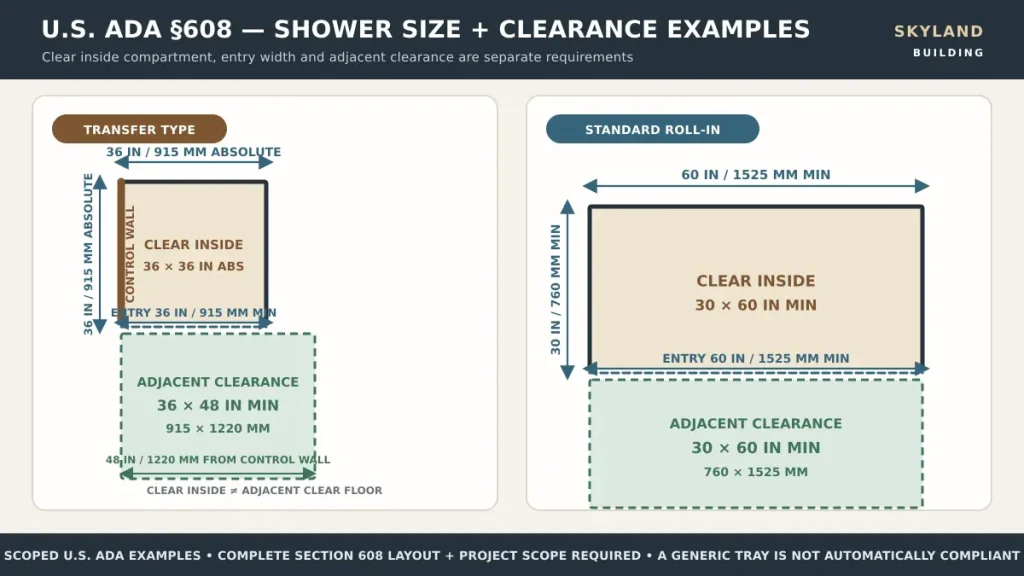
Where the US ADA Standards apply, Section 608 distinguishes specific shower layouts. These figures describe clear inside dimensions and required access, not nominal tray sizes. The ADA uses published metric equivalents that differ slightly from the direct conversions in the earlier planning chart.
| ADA layout | Clear inside compartment | Entry and adjacent clearance |
| Transfer type | 36 × 36 in absolute 915 × 915 mm | Entry ≥36 in (915 mm); adjacent clearance ≥36 × 48 in (915 × 1220 mm), measured from the control wall |
| Standard roll in | ≥30 × 60 in 760 × 1525 mm | Entry ≥60 in (1525 mm); adjacent clearance ≥30 × 60 in (760 × 1525 mm) |
Full requirements also cover seats, controls, grab bars, thresholds and approach. A standard 36 inch square enclosure is not automatically an accessible transfer shower, and a curb-free floor does not by itself establish a compliant roll-in layout. Use the project’s governing accessibility standard and complete detail.
How to measure a shower before ordering
Keep rough construction measurements separate from the final survey used to release the base and glass. For an unfinished room, record the designed wall and floor build-ups and identify which dimensions remain provisional.
1. Identify the enclosure type and reference surfaces. Mark the front, back, left and right sides on the room plan.
2. Measure width at the bottom, middle and top of the relevant opening. Record every value and the measurement height.
3. Measure depth to the proposed threshold or entry line. Check both sides where the layout requires it.
4. Check diagonals, wall plumb and corner angles. Record tapered walls and out-of-square conditions.
5. Record finished-floor levels, tray or curb condition, floor fall, glass height and any ceiling obstruction.
6. Locate the drain center, water connections, controls and support or fixing zones from labeled reference edges.
7. Draw the clear entry and door operating path with adjacent fixtures, cabinet doors and the room door.
8. Compare the site record with the exact base and enclosure drawings, adjustment range and installation method.
9. Have the installer and supplier resolve provisional dimensions before releasing the order or custom glass drawing.
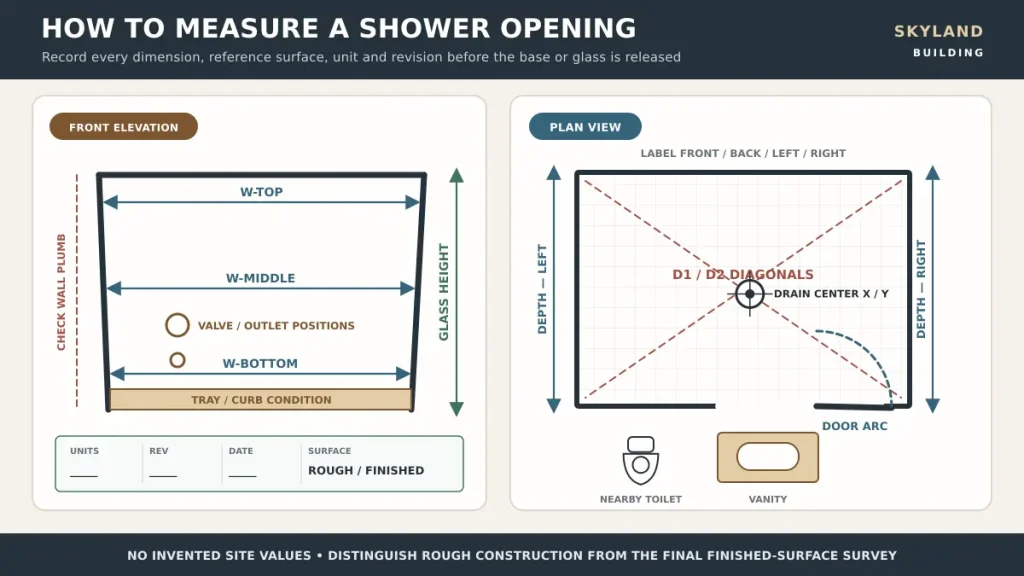
Keep the measurement record with your drawings and approvals documents. Skyland’s drawing and sample coordination service can help organize the product data, drawings and finish references for review.
Checks before ordering a shower enclosure
• Exact room reference, quantity, model and approved drawing revision.
• Base outside size, finished interior, enclosure adjustment range and clear entry recorded separately.
• Drain, flange, floor levels, waterproofing transition and glass fixing lines coordinated.
• Glass specification, hardware, seals, finish and fixing support confirmed for the selected system.
• Door travel, approach, nearby fixtures and service access checked on the bathroom plan.
• Applicable local requirements and model-specific supporting documents reviewed.
• Installer-verified final dimensions, packing references and delivery access agreed.
For custom items, follow the shop drawing approval process and retain the approved measurement and release references. Compare wet-area finishes using porcelain tiles vs ceramic tiles, then verify the exact floor tile’s suitability for the intended shower use. Tile and grout do not replace the waterproofing assembly.
Standard shower dimensions FAQ
What is a standard shower size?
Common square options include 32 × 32 and 36 × 36 inches. Rectangular options include 48 × 36, 60 × 30 and 60 × 36 inches. These are product and planning footprints; the clear finished interior depends on the selected assembly.
Is a 32 by 32 inch shower big enough?
It can suit a compact layout, but check the clear interior, passage opening and ability to turn and bend. A 36 inch square adds space in both directions. The users and local requirements should guide the choice.
Is 36 by 36 inches a good shower size?
It is a useful square starting point for comparison. A larger rectangular layout may suit a bench or a different entry arrangement. Test the actual standing and entry zones rather than deciding from the nominal size alone.
What size should a walk in shower be?
Walk-in showers have no universal footprint. Test a layout such as 60 × 36 inches against the screen, spray direction, entry and bathroom route. Water containment and drainage must be resolved for the selected plan.
Can a shower replace a 60 inch bathtub?
A base with a tub-alcove proportion may suit the opening, but the wall finish, drain center, floor assembly and door operation still need to be checked. An existing bathtub size is not a shower order dimension.
What are standard shower dimensions in millimeters?
Direct rounded conversions include 813 × 813 mm for 32 × 32 inches, 914 × 914 mm for 36 × 36 inches and 1524 × 914 mm for 60 × 36 inches. Metric catalog sizes such as 900 × 900 mm are separate product dimensions.
Do the tray and glass enclosure need the same listed size?
They need compatible installation dimensions. Glass may sit inside the base edge and use an adjustment range, so matching catalog labels alone is insufficient. Compare both drawings and their reference lines.
What is the minimum shower size?
Minimums depend on the jurisdiction, adopted code and accessibility scope. The IRC example above has a general 900 square inch interior area and 30 inch minimum interior dimension, with exceptions. Check the complete local requirements for the proposed assembly.
Does a curbless shower meet accessibility requirements?
A curbless entry is one feature. Accessibility also depends on the compartment, clearances, route, controls, seat and grab bars under the applicable standard. A flat-looking transition alone does not establish compliance.
Coordinate the shower with the bathroom package
Keep the enclosure, fittings, base or tiled floor, waste and nearby cabinetry on the same dimensioned plan. Skyland Building can review product selections as part of a coordinated sanitary ware package for a villa, apartment or other building project.
To discuss a project, send your bathroom plan and fixture schedule. Include the project location, room quantities, available drawings, finished dimensions, preferred enclosure type, hardware finish and delivery requirements.