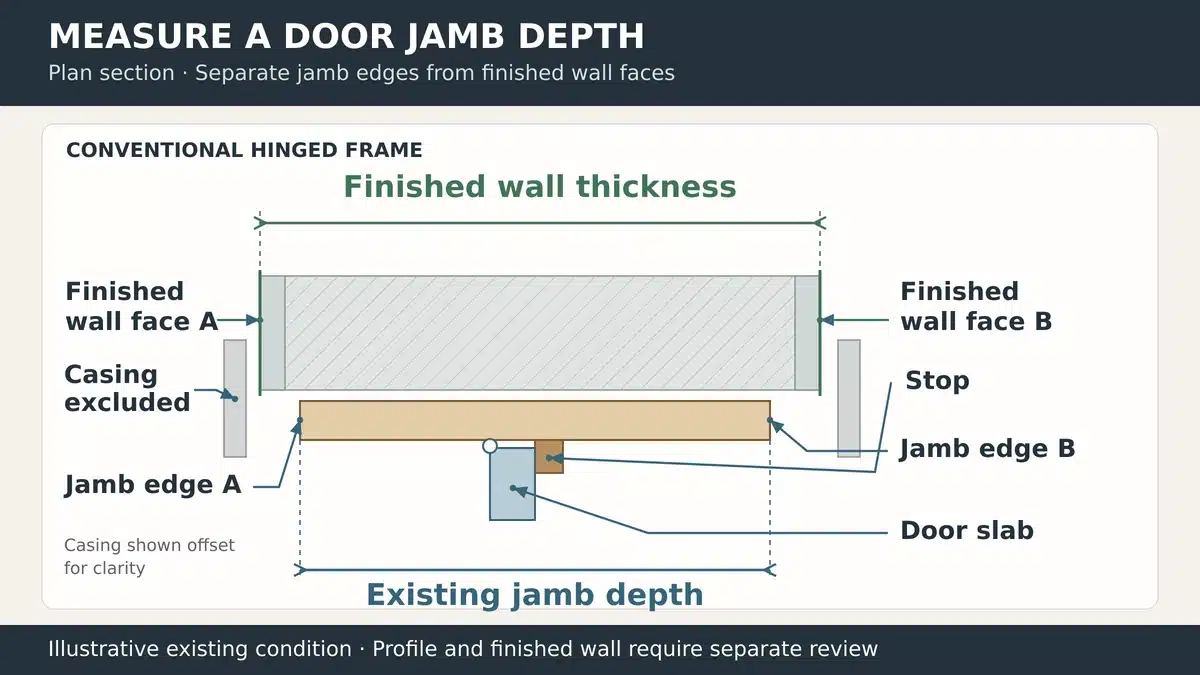
To measure a door jamb, first identify the dimension the supplier calls jamb width or jamb depth. For many door frames, this is the front to back span across the wall, excluding decorative casing. Measure the existing jamb and the finished wall thickness separately, then record the opening width and height using clearly identified endpoints. Check several locations and confirm the selected replacement system before ordering.
This guide focuses on common hinged door frames. A jamb is part of the fixed frame; the door slab is the moving panel. The hinge jamb and strike jamb run vertically, and the head jamb spans the top. Their dimensions must suit the wall, floor and door system as a coordinated assembly.
Written by Winston, Project Director at Skyland Building · 10+ Years of Building Materials Experience
Updated October 2026 · 11-minute read
Door jamb measurements at a glance
| Dimension | What to measure | Do not confuse it with |
|---|---|---|
| Jamb depth or catalog jamb width | Front to back span of the specified jamb profile. | Horizontal width across the doorway |
| Finished wall thickness | Finished wall face to finished wall face. | Nominal framing size or trim projection |
| Existing frame opening | Width and height between the stated frame reference surfaces. | Door slab size or accessible clear opening |
| Door slab size | Actual panel width, height and thickness. | Outside dimensions of the complete frame |
| Rough opening | Structural opening receiving the door unit. | Visible opening inside an installed frame |
Jamb width is an ambiguous label. Some catalogs use it for the same front to back dimension called jamb depth; others request a separate frame width. Put arrows on a sketch and use the supplier’s worksheet. Our standard door sizes and opening terms guide explains why slab, frame, finished opening and rough opening dimensions cannot be substituted for one another.
Prepare the doorway and choose the replacement scope
Decide whether you are replacing the slab or the frame
If the existing frame will remain, survey the door slab, its thickness, hinge positions and lock preparation as well as the frame condition. Jamb depth alone does not specify a replacement slab. If you are replacing a prehung door, the survey must also support the new frame and its required rough opening. Prehung units combine a door with a frame; supplied hardware and other inclusions depend on the product.
For separate jamb components, record the complete profile, stop or rebate arrangement, material, required lengths and hinge or strike preparation. A rectangular depth measurement cannot describe every shaped frame section. Compare the required package with the available wooden door systems before requesting a quotation.
Gather tools and expose the correct reference surfaces
Use a readable tape measure, a level or rigid straightedge, a notebook and a camera. Assign the doorway an opening number and record the measurement unit. Keep the tape straight rather than diagonally across a surface. A straightedge can help project a finished wall plane where the tape cannot reach it directly.
Casing is the trim around the frame. If it hides the jamb edges or framing, have the necessary trim carefully removed or use an accessible, representative section. Mark hidden or estimated dimensions for verification. A measurement taken over casing is not jamb depth. For exterior doors, arrange inspection without casually disturbing sound flashing, seals or weatherproofing.
Step 1: Measure the Existing Jamb Depth
Measure the full front to back span
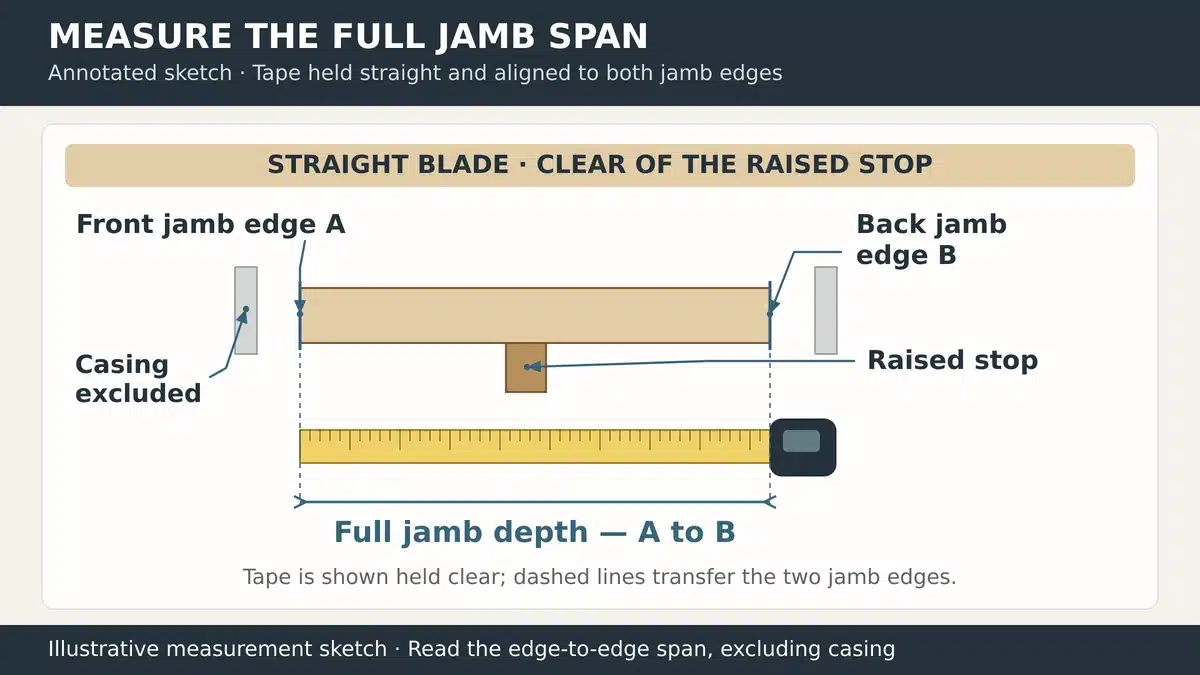
Locate the inner and outer edges of the jamb profile identified by the supplier. On a conventional flat jamb, measure straight across the full front to back span. Exclude casing or brickmould that projects beyond those edges. Do not stop at the door stop and measure only the exposed strip beside it. The stop controls where the slab closes; its projection is not an extra wall layer.
Photograph the tape endpoints and sketch any integral stop, rebate, extension or unusual section. If trim conceals an edge, do not guess its position from the paint line. An old frame may include an extension that is a separate piece; record that joint and the dimensions requested for each component.
Retain readings from more than one location
Check accessible locations near the top, middle and bottom of the side jambs, including both sides of the doorway where conditions differ. Retain each reading and its location. Bowed walls, patched finishes and added paneling can make one section unrepresentative. Do not automatically select the smallest depth as the order size; the frame profile and finish detail must resolve the variation.
Step 2: Measure the Finished Wall Thickness
Measure from the finished wall face on one side of the doorway to the finished wall face on the other, excluding the casing. This wall measurement is related to jamb depth but is not automatically identical to the existing jamb. Note which wall faces align with the frame and whether either edge is recessed or projects beyond the finish.
Record the layers that will remain, such as plasterboard, plaster, tile or paneling. If finishes will change, keep the existing measurement and the proposed build-up in separate fields. Do not order from a nominal stud size alone. A supplier may offer an extension jamb or an adjustable frame, but the permitted range and junction details belong to that specific system.
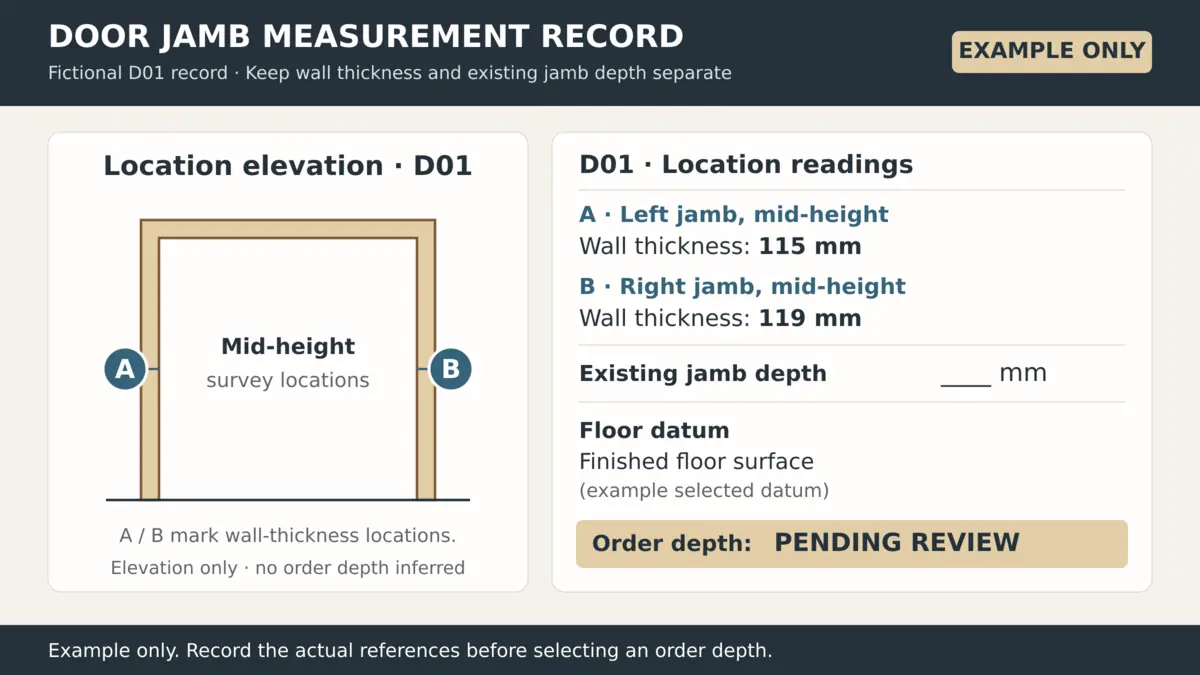
A sample wall thickness record
For example, an existing finished wall measuring 115 mm at one location and 119 mm at another should be recorded as two located readings. It should not become a single 117 mm average or an automatic 115 mm order. These numbers illustrate a recording method only. Show the difference to the supplier so the frame depth, extensions and trim can be coordinated.
Step 3: Record Opening Width, Height and Condition
Keep existing frame and rough opening measurements separate
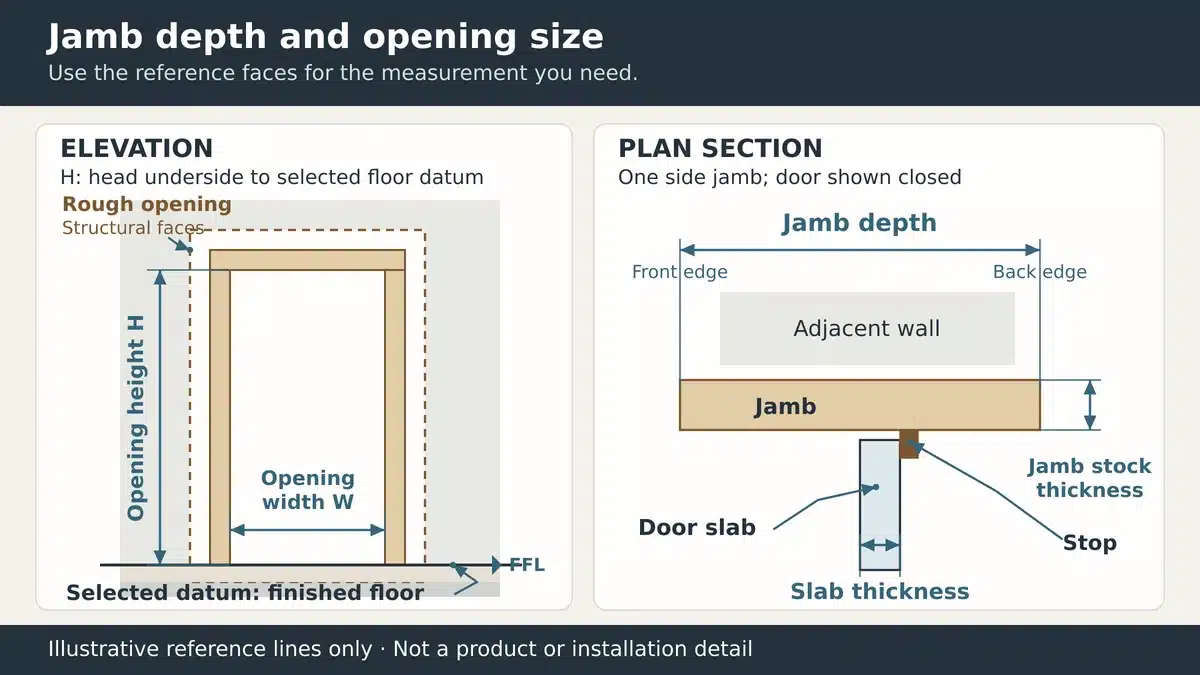
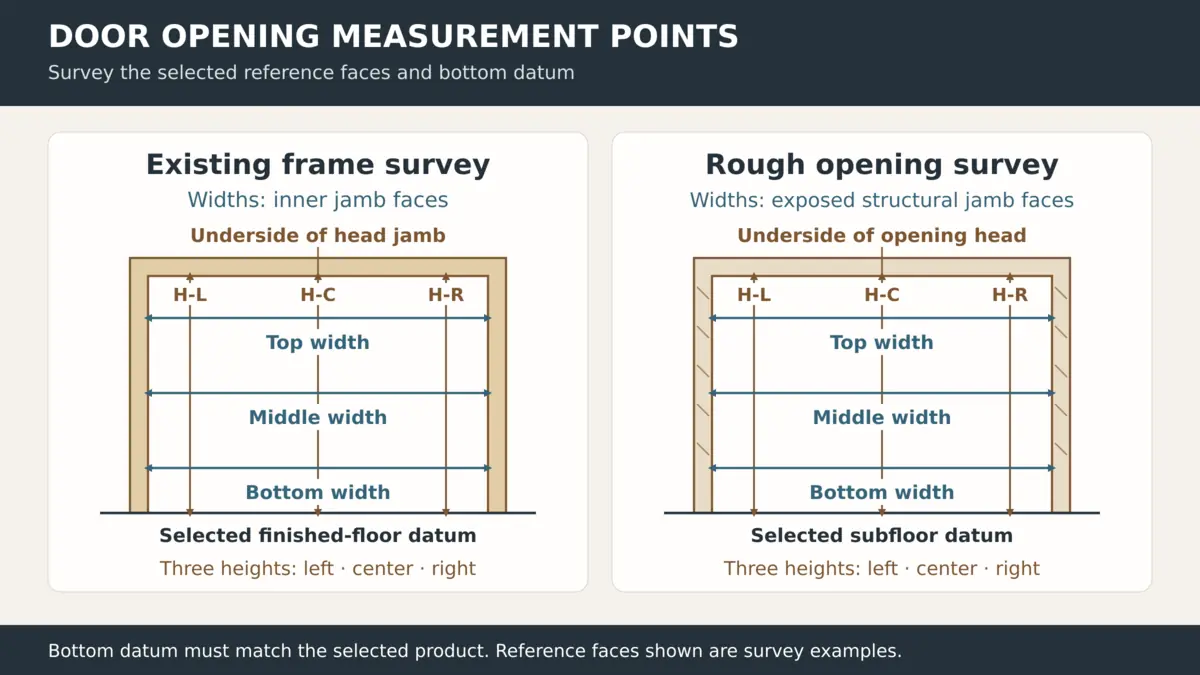
For an existing frame opening, identify the exact inside surfaces used and state whether stops or rebates affect the reading. Take horizontal widths near the top, middle and bottom at the same reference plane. Do not label a measurement taken through an installed frame as the rough opening. Also avoid calling it an accessible clear width: a usable passage measurement can depend on the open door, stops and hardware.
If the replacement requires rough opening dimensions, expose and identify the structural opening as directed by the selected manufacturer. Record framing to framing widths separately from the frame opening. Retain all readings and identify the smallest relevant width and height for the fit review. Do not add a universal allowance to a slab size to invent a rough opening.
State the height datum and the future floor level
For a frame opening survey, measure vertically from the underside of the head jamb to the stated finished floor or top of threshold. Record the left, center and right readings where accessible. A rough opening survey instead uses the structural header and the bottom datum specified by the manufacturer, which may be the finished floor or subfloor. Write that datum on the record.
List any planned flooring, underlay, carpet or threshold change. A compressible carpet surface is not a reliable substitute for a confirmed installation level. Preserve the existing readings and identify the proposed finished level separately. Do not use a nominal door height to infer the remaining clearance.
Check diagonals and alignment
Measure both diagonals between the same identified corners where accessible, then check the jambs for plumb and the head for level. Different diagonals or changing widths can flag an irregular opening; equal diagonals alone do not prove every surface is straight or suitable. Record bow, damage and floor slope with the individual dimensions rather than hiding them in an average.
Step 4: Match the Survey to the Selected Door System
Interior doors and common jamb depth references
The dimensions listed as stock jamb sizes are product and market references, not universal wall standards. Masonite’s interior door measurement guide lists examples such as 4 9/16 inches and 6 9/16 inches. These are approximately 115.9 mm and 166.7 mm. Their availability does not mean either will fit an unmeasured wall.
Confirm the manufacturer’s exact available depth, profile and tolerances against the survey. Check both finished wall faces and the intended casing detail. For a retained frame, compare slab and hardware preparation rather than assuming that matching the nominal door size establishes the complete fit.
Exterior Doors, Pairs and Folding Systems
For an exterior assembly, show the sill or threshold, inside and outside finishes, frame extensions, swing direction and any sidelights. Masonite’s exterior measuring instructions distinguish jamb depth from trim and use a subfloor datum for the rough opening height. Follow the worksheet for the selected product rather than transferring a height datum from an interior door example.
For pairs, use the French door measuring guide to review the full assembly, meeting edges and threshold. Folding doors also need track and pivot coordination; the bifold door sizes and measuring guide addresses those additional references. A jamb survey does not replace the system’s installation dimensions.
Door jamb measurement record for ordering
Use one record per opening. Enter actual measurements, units and endpoints instead of leaving unexplained labels such as width. Keep preliminary measurements distinct from verified dimensions released for ordering.
| Record field | Information to retain |
|---|---|
| Opening identity | Door number, room, location, date and surveyor. |
| Replacement scope | Slab only, separate jamb components or complete frame and door. |
| Existing jamb | Depth by location, profile sketch, stop or rebate, extensions. |
| Wall finishes | Finished wall thickness readings, layers and proposed changes. |
| Opening geometry | Located frame or rough opening readings, labeled separately. |
| Height reference | Head reference, finished floor, subfloor or threshold datum. |
| Condition and hardware | Diagonals, plumb, level, bow, hinge and lock information. |
| Order review | Supplier worksheet, handing sketch, drawing revision and approval status. |
Sketch the swing with the viewing side identified and include photographs. Handing names can depend on the supplier’s convention, so a left or right label without a viewpoint is incomplete. For multiple doors, align the record with the door schedule and use the shop drawing approval process to resolve frame, finish and floor interfaces before release.
Common mistakes when measuring a door jamb
- Using jamb width to mean opening width without confirming the supplier’s definition.
- Measuring over casing or only from the stop to one jamb edge.
- Assuming the old jamb depth equals the new finished wall thickness.
- Choosing an average or minimum wall depth without resolving uneven finishes.
- Calling a visible frame opening the rough opening behind it.
- Mixing finished floor, threshold and subfloor endpoints in the same height field.
- Ordering a slab without matching hinges, thickness and lock preparation.
Door jamb measurement questions
Is jamb width the same as door width?
Usually not. A supplier may use jamb width for the front to back depth of the frame, while door width describes the slab. Confirm the section and reference points on the order sheet.
Can I measure a door jamb without removing trim?
Only where the required endpoints are visible or can be established reliably. Opening measurements may be accessible with trim in place, but hidden jamb edges or framing need verification before ordering.
Does jamb depth include the door stop?
Measure the full front to back span specified for the jamb profile. Do not add the stop’s raised projection to that span, and do not measure only the strip between the stop and one edge. Exclude decorative casing.
What if the jamb is narrower than the finished wall?
Record the difference on each side and show it on a section. An approved extension or adjustable system may address the junction, but the supplier must confirm compatibility and the finishing detail.
Should I order from the smallest measurement?
Keep all readings. A minimum relevant rough opening width or height helps identify a fit constraint, but it is not automatically a slab size or jamb depth. Confirm the final dimensions and allowances against the selected system.
Coordinate door measurements with your project schedule
Skyland Building’s drawing and sample coordination service can organize available door schedules, sections, finish references and revision comments around the agreed package. Site dimensions, technical acceptance and final release still need confirmation by the responsible project parties.
Send your door schedule and measurements with opening numbers, jamb and wall readings, labeled height datums, photographs, replacement scope and project location. Identify missing or estimated dimensions so they can be resolved before the order is finalized.